Welcome back to Episode 5! Now that we have our character moving around the world and turning to face where they’re going, it’s time to bring them to life with animations.
In this episode, we’ll start with a simple approach using the AnimationPlayer node and some conditional logic, then graduate to more advanced animation features with AnimationTree in the next episode.
Getting a reference to our AnimationPlayerJump to 0:51
The first thing we need is a reference to our AnimationPlayer node so we can control which animations play based on our character’s movement speed. Instead of typing out the path manually, Godot has a neat shortcut we haven’t shown you yet.
If you hold Ctrl and drag the AnimationPlayer node from the scene tree into your script where you want the code to go, Godot will automatically generate the variable declaration for you! This creates an @onready variable with the correct path.
Let’s rename the generated variable to something shorter like anim_player to make our code more concise.
1extends CharacterBody3D
2@onready var anim_player: AnimationPlayer = $Mesh/AnimationPlayer
3
4## Determines how fast the player moves
5@export var speed := 5.0
6const JUMP_VELOCITY = 4.5
7@onready var camera: Node3D = $CameraRig/Camera3D
Oops...
While editing this article, I realized that we have a typo with our CameraRig node. It should be
CameraRigand notCamerRig. This typo is present in the code and the video, so make sure to correct it in your project.
Playing animations based on movement speedJump to 1:36
Now we can control our animation player from code. We’ll add this logic to the bottom of our _physics_process function so it runs every frame after we’ve calculated our character’s movement.
The idea is simple: we’ll check our character’s current movement speed and play different animations based on that speed.
First, let’s capture our current movement speed using the velocity that was calculated by move_and_slide(). This gives us the actual speed our character is moving, which might be different from our input if we hit a wall or obstacle.
30⇥move_and_slide()
31⇥turn_to(direction)
32
33
34⇥var current_speed := velocity.length()
The length() function (also called magnitude) gives us the total speed regardless of direction. This is perfect for determining which animation to play.
Running before we can walkJump to 2:20
Now we can use conditional statements to play different animations based on the speed. Using the play() method on the AnimationPlayer node, we can specify the name of which animation we want to play. We only want this to happen when the player is moving though…
That means we’ll need to wrap our play() call with an if statement. The condition will check if the player is moving by comparing current_speed to some “threshold value”. Our player character’s top speed is stored in the speed property at the top of the script, which is currently set to 5.0, so let’s pick a value just below that like 3.5.
34⇥var current_speed := velocity.length()
35
36⇥if current_speed > 3.5:
37⇥⇥anim_player.play("freehand_run")
As soon as our character’s speed exceeds 3.5, the run animation will play. If the player stops moving, then… the run animation will keep playing…
That’s because we haven’t added any logic to handle when the player is not moving. This is the perfect use case for the else statement, which lets our if condition run a different block of code when the condition is false.
34⇥var current_speed := velocity.length()
35
36⇥if current_speed > 3.5:
37⇥⇥anim_player.play("freehand_run")
38⇥else:
39⇥⇥anim_player.play("freehand_idle")
Great! We can stop running. If you’re using your keyboard to test your game, then everything probably feels like we’re done. But if you pick up a controller with an analog stick, you’ll notice that the character slides around until we near “full throttle”.
We just need one more case in our chain of conditionals: elif. Once again, this is short for else if and it allows us to check another condition if the previous one was false before moving onto the else block if both conditions fail.
34⇥var current_speed := velocity.length()
35
36⇥if current_speed > 3.5:
37⇥⇥anim_player.play("freehand_run")
38⇥elif current_speed > 0.0:
39⇥⇥anim_player.play("freehand_walk")
40⇥else:
41⇥⇥anim_player.play("freehand_idle")
Anytime we’re completely stopped, we play our idle animation. Then once we start moving a little bit, we switch to the walk animation. Finally, if we reach our run speed, we play the run animation.
Handling the case where we're falling
As it stands right now, the
velocityvariable includes the vertical speed from gravity. This means that when the player is falling,current_speedwill be greater than0even if they aren’t moving horizontally, so they’ll begin running in response to a fall.If you want to use this simpler approach to animations in your project, then you’ll want to remove the vertical component (
yaxis) fromvelocitybefore checking the speed OR you could check that the player is on the ground first. This second approach is better, especially since we do have a falling animation we could switch to instead.scripts/player.gd30⇥move_and_slide() 31⇥turn_to(direction) 32 33 34⇥var current_speed := velocity.length() 35 36⇥if not is_on_floor(): 37⇥⇥anim_player.play("freehand_fall") 38⇥elif current_speed > 3.5: 39⇥⇥anim_player.play("freehand_run") 40⇥elif current_speed > 0.0: 41⇥⇥anim_player.play("freehand_walk") 42⇥else: 43⇥⇥anim_player.play("freehand_idle") 44
Adding animation blending for smoother transitionsJump to 9:44
Unfortunately, the transitions between these animations is very abrupt and doesn’t look or feel natural. Let’s add some blending to smooth out these transitions. There’s 2 approaches we could take here.
The first is to set a default blend amount to all animations using the playback_default_blend_time property1 on the AnimationPlayer node. This will apply a global blend time to all animations that don’t specify their own blend time.
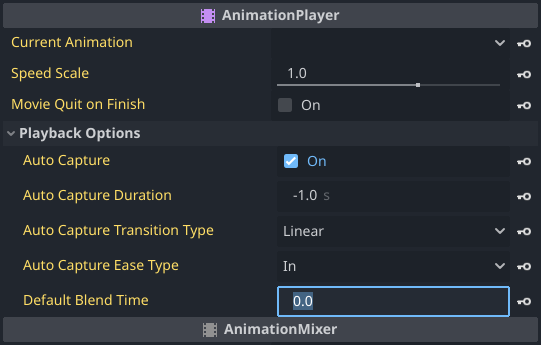
The Default Blend Time property is hidden under the Playback Options section of the AnimationPlayer node.
The second approach gives us more control, since we can specify custom blend times whenever we call play(). This is because play() has several optional parameters2 after the first parameter (the name of the animation that we’re trying to play).
func play(name: StringName, custom_blend: float = -1, custom_speed: float = 1.0, from_end: bool = false) -> voidThe second parameter, blend_speed, let’s us set the blend when transitioning to the animation we specified in the first argument. We can set this to a small value like 0.2 to make the transitions smoother but not too fast or too slow.
36⇥if current_speed > 3.5:
37⇥⇥anim_player.play("freehand_run", 0.2)
Before we continue, let’s quickly replace our “magic numbers”3 with some named constants. That way we can adjust things once and have those changes apply anywhere.
36⇥const RUN_SPEED = 3.5
37⇥const BLEND_SPEED = 0.2
38
39⇥if current_speed > RUN_SPEED:
40⇥⇥anim_player.play("freehand_run", BLEND_SPEED)
41⇥elif current_speed > 0.0:
42⇥⇥anim_player.play("freehand_walk")Adding dynamic animation speed for walkingJump to 11:31
Here’s where things get interesting. For our walk animation, we want the animation speed to match how fast the character is actually moving. When the player barely pushes the joystick, the character should walk slower, and when they push it further, the character should walk faster4.
We can achieve this using the third parameter of the play() function, which controls animation speed as a multiplier. A value of 1.0 plays at normal speed, 0.5 plays at half speed, and 2.0 plays at double speed.
Add BLEND_SPEED, followed by current_speed / RUN_SPEED to the play() call for the walk animation.
34⇥elif current_speed > 0.0:
35⇥⇥anim_player.play("freehand_walk", BLEND_SPEED, current_speed / RUN_SPEED)
We divide current_speed by RUN_SPEED because that’s our threshold for switching to running. This gives us a value between 0 and 1 that represents how much of our walking speed range we’re using.
- At speed 1, we get
1/3.5 = 0.29(29% animation speed) - At speed 2, we get
2/3.5 = 0.57(57% animation speed) - At speed 3.4, we get
3.4/3.5 = 0.97(nearly full animation speed)
Improving the speed mapping with lerpJump to 14:24
The problem with our current approach is that very slow movement results in very slow animation. Instead of having our animation speed range from 0% to 100%, let’s remap this to a more reasonable range like 50% to 175% using lerp.
34⇥elif current_speed > 0.0:
35⇥⇥anim_player.play("freehand_walk", BLEND_SPEED, lerp(0.5, 1.75, current_speed / RUN_SPEED))
This ensures our walk animation never looks too slow, and at higher speeds, it gets a bit faster to transition more naturally into running.
Testing the final resultJump to 19:12
With all these improvements in place, your character should now smoothly transition between animations with speeds that match their movement. The idle animation plays when stationary, walking animation speed scales with movement speed, and running kicks in at higher speeds with smooth blending between all states.
Here’s what our final animation code looks like:
30⇥move_and_slide()
31⇥turn_to(direction)
32
33
34⇥var current_speed := velocity.length()
35⇥const RUN_SPEED := 3.5
36⇥const BLEND_SPEED := 0.2
37
38⇥if current_speed > RUN_SPEED:
39⇥⇥anim_player.play("freehand_run", BLEND_SPEED)
40⇥elif current_speed > 0.0:
41⇥⇥anim_player.play("freehand_walk", BLEND_SPEED, lerp(0.5, 1.75, current_speed/RUN_SPEED))
42⇥else:
43⇥⇥anim_player.play("freehand_idle")
Don't forget to blend the idle animation
Something we forgot to address before ending the episode is the transition back to our idle animation. If you’re not using the
Default Blend Timeproperty, then you’ll want to add a blend time to the idle animation as well.scripts/player.gd42⇥else: 43⇥⇥anim_player.play("freehand_idle", BLEND_SPEED)
What’s next?
We’ve covered the basics of animation control with code, but Godot offers even more powerful animation features through the AnimationTree node. We’ll start talking about that in the next episode.
For now, your character should feel much more alive and responsive to player input. As always, don’t hesitate to experiment with the blend times and speed ranges to find what feels best for your game.
Want to compare your work to ours? You can find a copy of the project on our GitHub repository. We track each episode as its own commit, so you can see exactly what changed between each episode. Check your work!