Okay, here we are at on episode 4 (and a half) of our action/adventure series! Last time we added the ability to control our camera, but now moving our character feels totally bizarre. Let’s fix that!
The goal of this episode is to get our player character moving in a direction based on where we1 are looking. This means that moving the joystick left will move our character to the left side of the screen or moving the joystick up will move our character away from the camera, and so on…
We’re also going to make our character turn to face the direction they’re moving, which will make the movement feel much more natural.
Preparing to turn our characterJump to 0:25
We probably should start by getting the player moving relative to the camera first, but this might actually be a good opportunity to demonstrate that sometimes your code isn’t broken — it’s just an order of operations issue. So let’s do this the hard way instead!
We’ll setup a new function called turn_to where we can put the logic for turning our character to face the direction they’re moving. As we get further into the series we may use this function for other things, so we’ll practice writing our own functions to keep our code organized.
Starting with the func keyword, we declare the function in the player.gd script, but we won’t fill it in yet. Just put pass for now and talk about what we want this function to do.
27⇥move_and_slide()
28
29func turn_to(direction: Vector3) -> void:
30⇥pass
The goal of this function is to take in the direction our character wants to move and rotate them towards that direction. We’ll pass in a Vector3 as the parameter2, since we can use this to represent an arbitrary direction in 3D space.
Don’t forget that a function doesn’t do anything until it’s called, so we need to make sure we call the turn_to function in our _physics_process function. We’re going to hand it the direction variable we already had for character movement, which is the direction our character is moving based on the input from the joystick or keyboard.
This means we need to put the turn_to function call somewhere after we calculate the direction variable. We can keep this easy and just stick it at the bottom of the _physics_process function, just below move_and_slide().
27⇥move_and_slide()
28⇥turn_to(direction)
29
30func turn_to(direction: Vector3) -> void:
31⇥passHow turn_towill workJump to 6:58
Let’s emulate what we want our code to do by rotating our player character in the editor. We can do this by selecting the Player node in the scene tree and rotating it around the Y axis. This will give us a visual representation of what we want our character to do when we call the turn_to function.
By doing this, we reveal a potential problem: If our player is rotated, the camera rig and camera rotate with it. This feels like a recipe for motion sickness if we’re not careful. Let’s attempt to fix this by divorcing our SpringArm3D node from the Player node’s rotation.
All Node3D nodes have a property called top_level that will cause the node to ignore its parent’s transformations (including rotation) when it’s set to true. Go ahead and enable the top_level property of the SpringArm3D node in the inspector to see what happens.
When we play the game now, our camera stays in place and our character is free to move wherever they want. This isn’t what we were trying to do though. We still want the camera to follow our player character, but we don’t want it to rotate with the player character.
Making our camera rig follow our playerJump to 8:13
To solve this we can add a small bit of code to our camera_rig.gd script. Every frame we want to update the position of the SpringArm3D node to match the position of the Player node. This way, our camera rig will follow our player character around without rotating with it.
We could do this in the _process function, but since our player movement is only updated every physics frame, we should use the _physics_process function instead. This will help us avoid unnecessary calculations every frame.
30⇥⇥Input.mouse_mode = Input.MOUSE_MODE_CAPTURED
31
32func _physics_process(delta: float) -> void:
33⇥pass
Add the _physics_process function to the camera_rig.gd script with a pass statement as a placeholder.
Getting a reference to the player characterJump to 9:00
In order to update the position of the camera rig, we’ll need to get a reference to the Player node. There’s a few ways we could do this, but we’ll just use the get_parent() method to get the parent node of the camera rig, which is the Player node.
We could use get_parent() directly in the _physics_process function, but that would be inefficient since it would call the function every frame. Instead, we’ll store a reference to the Player in a variable when our SpringArm3D is setup.
Caching results for performance
Function calls have a cost associated with them. Sometimes this cost is crazy small, other times it’s not. That’s why it can sometimes be a good idea to trade a little bit of memory for performance.
This is especially true in game development where we want to keep our frame rate high and our game running smoothly. We can “cache” the results of expensive function calls by storing them as properties on our nodes (and other classes). The idea is that we can call the function once, store the result, and then use that result multiple times without having to call the function again.
But! If you have a function that returns a value that changes frequently, you probably don’t want to cache it. For example, if you have a function that returns the position of a node, you probably don’t want to cache it since the position can change every frame.
At the top of our camera_rig.gd script, we’ll setup a new variable to hold a reference to our Player node. We’ll just use Node3D for the type3 and immediately assign it the value of get_parent() to get the parent node of the camera rig.
6var mouse_input: Vector2 = Vector2()
7var player: Node3D = get_parent()
With the player variable ready, we can now use it to access the player character’s position in our _physics_process function. What we’re trying to do is move the SpringArm3D node to where the player is, so we just need to set the position to the player.position.
33func _physics_process(delta: float) -> void:
34⇥pass
34⇥position = player.position
What is
self?In the video we mentioned we could also write this line like
self.position = player.position, but what isself?GDScript is an object-oriented language, which means it has a concept of classes and instances. When we write
self.position, we’re referring to thepositionproperty of the current instance of the class we’re within.We can use
selfto access properties and methods of the current instance of the class, but in GDScript, we can often omitselfwhen accessing properties and methods. If you ever want to be explicit about which instance you’re referring to, or if you’re passing the instance to another function or method, you can useself.
If we try to run our game now, we’ll get an error that we can’t assign the position property on a base object of type null instance4. This is because player has nothing assigned to it because the get_parent() method didn’t return anything. Why not?
Well, it’s because the camera_rig.gd script is calling the get_parent() method before the SpringArm3D node has been added to the scene tree. This is why the _ready function is so important — it runs after the node has been added to the scene tree, so we can safely access its parent.
So we could fix this by moving the get_parent() call to the _ready function, but that would mean we have to split up the variable declaration and the assignment. Instead, we can use the @onready annotation to keep it all on one line.
6var mouse_input: Vector2 = Vector2()
7var player: Node3D = get_parent()
7@onready var player: Node3D = get_parent()
Real quick, let’s also rename our SpringArm3D node to CameraRig so it’s more clear what it does. With that taken care of, we can run the game again and see if we’re finally following our player character around (again).
We’re at the player’s feet…Jump to 15:27
We’ve got our camera following the player character again, but there’s a problem. We’re positioned at the bottom of the player character, right between their feet. This is because the position property of the CameraRig node is set to the player’s position, which is at the bottom of the player character.
To fix this we need to incorporate an offset to the camera rig’s position so that it sits above the player root position. This is similar to how we handled the spring_length in the last episode, where we cached the value in a variable when the camera rig was setup.
The easiest path forward is to do this all at once by declaring a new variable named camera_rig_height. We can set this to the position.y of the camera rig when it’s initialized, which will give us the height of the camera rig above the player character5.
6var mouse_input: Vector2 = Vector2()
7var player: Node3D = get_parent()
8var camera_rig_height: float = position.y
With that variable set, we can use it to offset the camera rig’s position in the _physics_process function. Instead of just setting the position to the player’s position, we’ll add the camera_rig_height to the Y component of the player’s position. This will raise the camera rig up to the correct height above the player character.
33func _physics_process(delta: float) -> void:
34⇥position = player.position
34⇥position = player.position + Vector3(0, camera_rig_height, 0)
Again, there are many ways to write code
Another way we could’ve done this would be to just add the
camera_rig_heightto the Y component of the player’spositionafter we set it. This would look like this:33func _physics_process(delta: float) -> void: 34⇥position = player.position 35⇥position.y += camera_rig_heightAnother way would be to store the entire initial
positionin a variable calledoffsetinstead of just the Y component.6var mouse_input: Vector2 = Vector2() 7var player: Node3D = get_parent() 8var offset: Vector3 = positionThen we could add the entire offset to the player’s position like this:
33func _physics_process(delta: float) -> void:
34⇥position = player.position + offset
Back to implementing turn_toJump to 19:36
That was a long detour to get back to where we started, but it was necessary to make sure we can turn our Player without rotating the CameraRig node with it. Now we can finally implement the most important part of our turn_to function and get our character to face the direction they’re moving.
We can do this by calculating the angle we need to rotate our character to face the direction they’re moving. We’ll use the atan2 function to calculate the angle based on the direction vector.
30func turn_to(direction: Vector3) -> void:
31⇥pass
31⇥var yaw := atan2(-direction.x, -direction.z)Explaining atan2Jump to 20:06
The atan2 function (short for “arc-tangent of 2 arguments”) is a mathematical function that calculates the angle between the positive x-axis and a point defined by its x and y coordinates. It is particularly useful in game development for determining the direction of movement or aiming based on a 2D coordinate system.
That last part is important: it’s a 2-dimensional function. Thankfully for us, we’re just going to use it to drive the yaw rotation of our character based on a direction vector flattened to the XZ plane6. This is kind of like looking down at our character from above.
Inputs
Output
atan2() calculates the rotation angle.But there’s one catch to how we’re going to use it. We need to negate the properties of the direction vector before we pass them to atan2. This is because Godot’s coordinate system is different from the one we’re used to in math class.
In Godot, forward is negative Z, right is positive X, and up is positive Y. This means that when we want to calculate the angle of a direction vector, we need to negate the X and Z components before passing them to atan2.
Applying our new rotationJump to 21:25
With the angle calculated, we’ll just replace our Player node’s rotation.y with the new angle stored in yaw. This will rotate our character to face the direction they’re moving7.
30func turn_to(direction: Vector3) -> void:
31⇥var yaw := atan2(-direction.x, -direction.z)
32⇥rotation.y = yawTesting our character turningJump to 21:44
Our character spins! Uh… constantly… and only while not moving forward? What’s happening here?
Our movement code is currently based on the player’s local space. This means that every frame we try to move in a direction[^not-forward], the direction vector is recalculated based on the player’s current rotation.
Then we call turn_to with the new direction vector (other than forward), which causes us to turn, so next frame when we try to move in a different direction, the direction vector is recalculated again based on the player’s current rotation, which causes us to turn again, and so on…
Surprisingly, this is actually a lot easier than it sounds!
Making our character move relative to the cameraJump to 22:15
Again, our goal is to make our character move in a direction relative to the camera. To do that, we’ll need the transform of our Camera3D node, since we’re going to use it as the basis8 for our player movement.
This means that we’ll need to get and store a reference to the Camera3D node in our player.gd script. To do this, we’ll use the @onready annotation to get the camera node when the player character is ready.
5const JUMP_VELOCITY = 4.5
6@onready var camera: Node3D = $CameraRig/Camera3D
Once again, we’re using the $ syntax to get a node by its path. The path of CameraRig/Camera3D will start from the player node and find a child node named CameraRig , then find a child node of that named Camera3D .
Path syntax in programming
This pattern of using slashes to separate nodes is actually based on the concept of paths in programming. It’s similar to how you might navigate directories in a file system, where each node is like a folder and the slashes separate them.
Paths actually show up all over in the world of computers with another common example being URLs, which use slashes to separate different parts of the address “path”.
With a reference to our Camera3D node, we can replace the transform.basis of our movement code in the player.gd script to use the camera’s transform basis instead of the player character’s transform.basis.
19⇥var input_dir := Input.get_vector("move_left", "move_right", "move_forward", "move_backward")
20⇥var direction := (transform.basis * Vector3(input_dir.x, 0, input_dir.y)).normalized()
20⇥var direction := (camera.transform.basis * Vector3(input_dir.x, 0, input_dir.y)).normalized()
What is
basis?A basis is a mathematical concept that represents a set of vectors that define a coordinate system. It’s a type of “matrix” that describes how to transform points in space relative to a specific orientation. Matrices like this are the bedrock of 3D graphics and game engines, allowing us to manipulate objects in 3D space.
But this isn’t quite right yet. That’s because we’ve accidentally used the Camera3D node’s relative transform basis instead of it’s global transform basis. This means we’re using the basis of the Camera3D relative to its parent, which is the CameraRig node.
To fix this, we can use the global_transform property of the camera node instead of the transform property. This will give us the global transform of the camera, which is what we want to use for our movement direction.
That’s pretty verbose though and this line is getting long. Thankfully, Godot has a shorthand for this. We can use the global_basis property, which is like a magic alias9 for global_transform.basis.
19⇥var input_dir := Input.get_vector("move_left", "move_right", "move_forward", "move_backward")
20⇥var direction := (camera.transform.basis * Vector3(input_dir.x, 0, input_dir.y)).normalized()
20⇥var direction := (camera.global_basis * Vector3(input_dir.x, 0, input_dir.y)).normalized()
Suddenly our character is moving in the direction we expect! If we move our joystick left, they move towards the left side of the screen. If we move it right, they move towards the right side of the screen. If we move it up, they move away from the camera and finally, moving it down makes them move towards the camera.
We’re getting a whole lot closer, but there’s still a few issues we need to address.
Accounting for the camera’s pitchJump to 25:27
If we look up or down while moving, our character will move in the direction we expect, but they also slow down the more the camera is pitched. This is because the camera’s basis factors in the Y component of the direction vector, causing us to move as if we were pushing into the floor, which we don’t want.
If our movement code didn’t have gravity and left the Y component when calculating the velocity for the frame, we’d see that pulling back while looking down would cause us to lift off the ground towards the camera. The inverse is true if we looked up and pressed forward.
19⇥var input_dir := Input.get_vector("move_left", "move_right", "move_forward", "move_backward")
20⇥var direction := (camera.global_basis * Vector3(input_dir.x, 0, input_dir.y)).normalized()
20⇥var direction := (camera.global_basis * Vector3(input_dir.x, 0, input_dir.y))
21⇥direction = Vector3(direction.x, 0, direction.z).normalized()
To fix this, we need to remove the Y component from the direction vector and then normalize it. This way, our character will only move in the XZ plane, which is what we want but we won’t be affected by the camera’s pitch.
Reminder about normalization
Normalization is the process of adjusting a vector’s length to be
1while maintaining the amount that each component contributes to the vector’s final value. This means that the vector’s direction remains the same, but its length is adjusted to be1.This works in both directions, so if the vector’s length is less than
1, it will make the vector longer, and if it’s greater than1, it will make the vector shorter.
Great, we’ve solved the issue of slowing down when looking up or down, but there’s still one more problem to solve. No matter how little we push the joystick, our character moves at a constant speed10. This is because the normalized function makes the vector’s length always equal to 1, so it doesn’t matter how far we push the joystick.
Thankfully since each component of the direction vector is now a percentage of the total direction we want to move, we can scale the vector down to match the total “length” of the joystick’s input. That would be the input_dir variable we created earlier.
19⇥var input_dir := Input.get_vector("move_left", "move_right", "move_forward", "move_backward")
20⇥var direction := (camera.global_basis * Vector3(input_dir.x, 0, input_dir.y)).normalized()
21⇥direction = Vector3(direction.x, 0, direction.z).normalized()
21⇥direction = Vector3(direction.x, 0, direction.z).normalized() * input_dir.length()
Now if we only push the joystick halfway to the right, our input_dir will be (0.5, 0) resulting in input_dir.length() being 0.5. This means that our direction vector will be scaled down to half its length, which is exactly what we want.
Vector lengths
All vectors have a length11, which is the distance from the origin (when every component is
0) to the point represented by the vector.You figure this out by using the Pythagorean theorem, which states that the length of a vector is equal to the square root of the sum of the squares of its components. So for a
Vector3, this means that the length of a vector(x, y, z)issqrt(x^2 + y^2 + z^2).
Maintaining our character’s rotationJump to 30:47
Our character is now moving around the way we want, but every time we let go of the joystick, they snap back to facing the same direction every time…
This is because our turn_to function is always setting the character’s rotation to face the direction they’re moving, but when we let go of the joystick, the direction vector becomes (0, 0, 0). When you feed zeroes into the atan2 function, it returns 0, which means that our character’s rotation is always set to 0 when we let go of the joystick12.
All we need to do is make sure we don’t give atan2 zeroes as inputs. We could do this by treating the direction vector as a boolean, which will be false if the vector is (0, 0, 0) and true otherwise. However, this might feel a little too magical, so let’s do something a bit more explicit.
32func turn_to(direction: Vector3) -> void:
33⇥if direction.length() > 0:
34⇥⇥var yaw := atan2(-direction.x, -direction.z)
35⇥⇥rotation.y = yaw
Instead, we’ll check the length of the direction vector before we call atan2. If the length is greater than 0, we’ll calculate the yaw and set the rotation13. If it’s not, we’ll just skip the rotation code.
Smoothing out the rotationJump to 33:59
Unless you’re planning to only support controllers in your game or want a more “retro” feel, you’ll probably want to smooth out the rotation of your character. Right now, our character snaps to face the direction they’re moving instantly. It’s not too noticeable when using a joystick, but it’s very noticeable when using a keyboard and mouse.
Nothing our good pal “lerp” can’t fix!
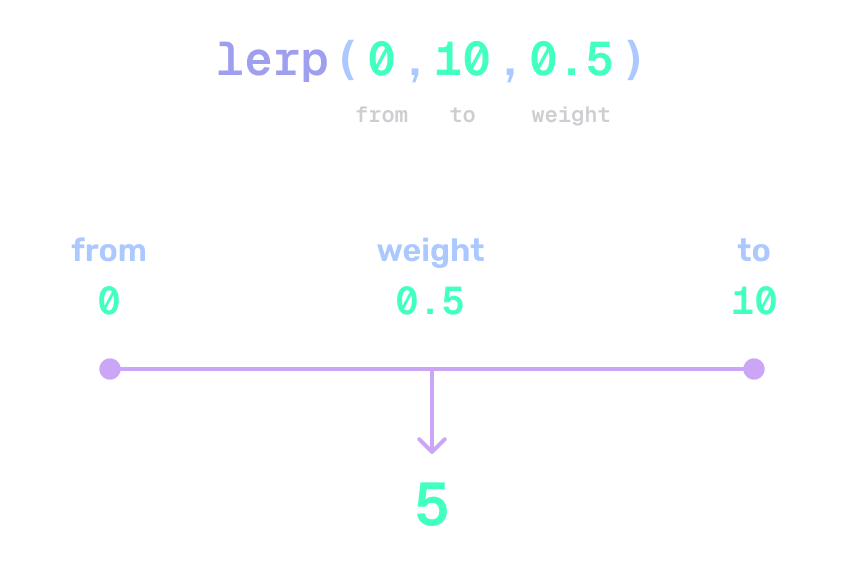
A visualization of how lerp works. You can see from and to on the left and right sides, with the weight value determining how far along the line we are. The result is the point on the line that corresponds to the weight value.
We might’ve covered this already in this series, but just in case, “lerp” stands for “linear interpolation”. It’s a way to sample a value between two points using a “percentage”. The percentage value is a float between 0 and 1 that determines how far along the line we are and is often called the “weight” or “alpha”.
If we use a value of 0 for the weight, then the result will be the first point. If we use a value of 1, then the result will be the second point. If we use a value of 0.5, then the result will be halfway between the two points.
When used in conjunction with time (specifically delta time within the _process or _physics_process functions)14, we can use lerp functions to smoothly transition between two values over a period of time.
Since we’re dealing with a rotation (angle in radians), we can use the lerp_angle function. Unlike lerp, which works with linear values, lerp_angle is specifically designed to work with angles. It takes into account the circular nature of angles.
This is important, because lerp would pick the most direct path between two angles, which could result in unwinding the long way around a circle. Instead, we want to take the shortest path between two angles, which is what lerp_angle does.
Lerp vs Lerp Angle
If we want to rotate from
350degrees to0,lerpwould try to go the long way around the circle, so we’d go350,349,348, …,2,1,0. This would look more like we’re sitting on a rotary phone, instead of smoothly transitioning to our desired angle.By taking the shortest path,
lerp_anglewill go from350to0by going350,351,352, …,359,0instead. This is much smoother and a more intuitive way to handle rotations.
Pass our current yaw rotation as from and the new yaw we calculated as to. The weight will be a value between 0 and 1 that determines how far along the line we are. Just pick a smallish value (since we’re doing this every physics frame) like 0.25.
32func turn_to(direction: Vector3) -> void:
33⇥if direction.length() > 0:
34⇥⇥var yaw := atan2(-direction.x, -direction.z)
35⇥⇥yaw = lerp_angle(rotation.y, yaw, 0.25)
36⇥⇥rotation.y = yaw
And just like that, our character is smoothly rotating to face the direction they’re moving! If we hold the joystick in a direction, they will rotate towards that direction at a constant speed. If we let go of the joystick, they will stop rotating and face the last direction they were moving.
We made it through another episode
Now we have a character that moves in the direction relative to the camera and turns to face the direction they’re moving. This makes the movement feel much more natural and intuitive.
With this in place, it’s probably time to start adding some animations to our character so they can really come to life. But that will have to wait until next time! As always, don’t forget to check out our Discord server to get help with your game development journey!
Want to compare your work to ours? You can find a copy of the project on our GitHub repository. We track each episode as its own commit, so you can see exactly what changed between each episode. Check your work!