Alright we are finally back at it for Episode 3. We know it’s been a while, there were various reasons for the delay, but we’re excited to continue our learning journey. In this episode, we’re going to start making our game feel more like a game by adding our first assets and implementing a camera system that allows the player to look around.
Episode Project Files
Download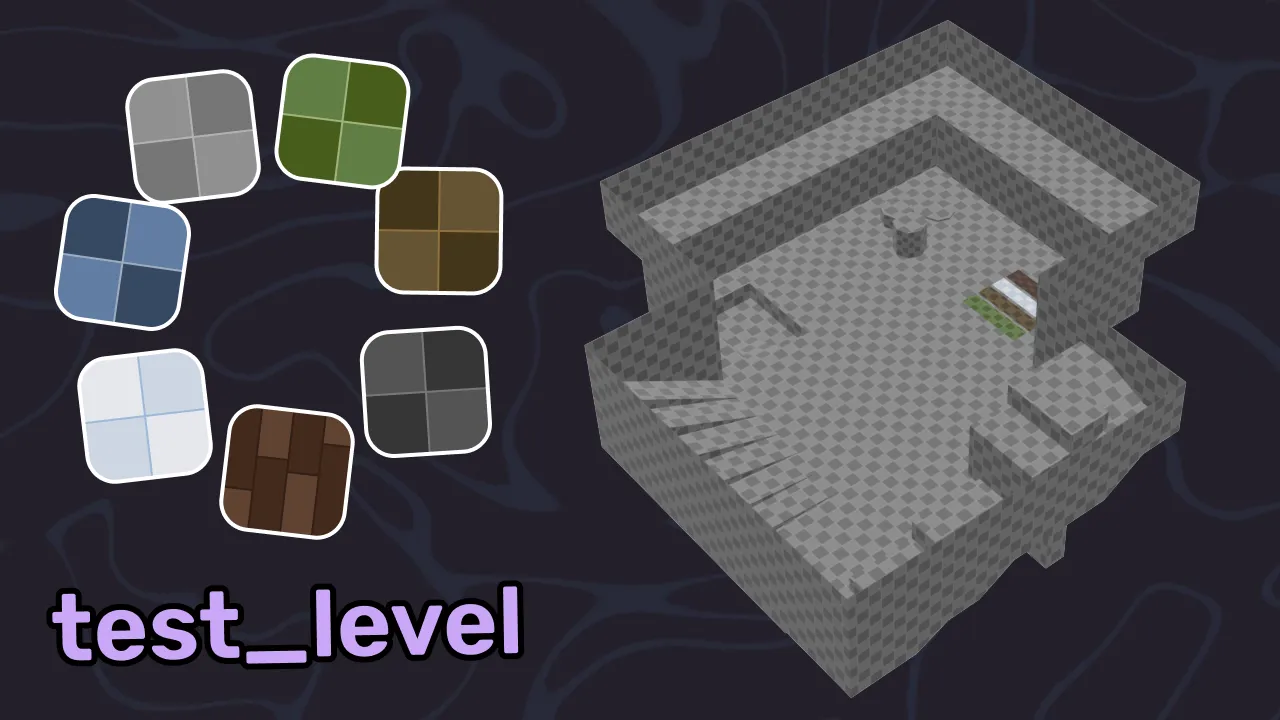
Before you continue, you'll want to download these assets as we'll be using them in this episode. These assets are bundled in a ZIP file that you'll need to extract before copying the files into your project.
Some quick housekeepingJump to 0:35
Before we start adding new code to our project, we need to do a bit of housekeeping to remove some example code from our previous episodes that we won’t be using. If you followed along exactly, then you’ll want to remove lines 7 through 12 in player.gd (or just copy the code below to replace it):
1extends CharacterBody3D
2
3## Determines how fast the player moves
4@export var speed := 5.0
5const JUMP_VELOCITY = 4.5
6
7func _physics_process(delta: float) -> void:
8⇥# Add the gravity.
9⇥if not is_on_floor():
10⇥⇥velocity += get_gravity() * delta
11
12⇥# Handle jump.
13⇥if Input.is_action_just_pressed("ui_accept") and is_on_floor():
14⇥⇥velocity.y = JUMP_VELOCITY
15
16⇥# Get the input direction and handle the movement/deceleration.
17⇥# As good practice, you should replace UI actions with custom gameplay actions.
18⇥var input_dir := Input.get_vector("move_left", "move_right", "move_forward", "move_backward")
19⇥var direction := (transform.basis * Vector3(input_dir.x, 0, input_dir.y)).normalized()
20⇥if direction:
21⇥⇥velocity.x = direction.x * speed
22⇥⇥velocity.z = direction.z * speed
23⇥else:
24⇥⇥velocity.x = move_toward(velocity.x, 0, speed)
25⇥⇥velocity.z = move_toward(velocity.z, 0, speed)
26
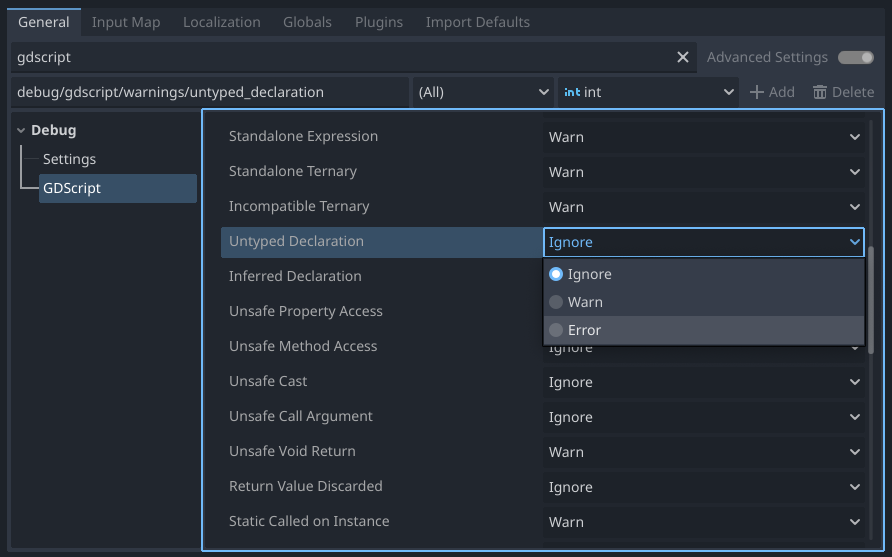
27⇥move_and_slide()You’ll also want to enable the “Untyped Declaration” setting we discussed in Episode 2.5 to help catch any potential issues with our code. You can find this setting in the project settings under Debug > GDScript1.
Adding our first 3D assetsJump to 0:55
You’ll need to download the assets for this episode using the download button up above in this article. Once you have the assets, you’ll want to extract them and then move them into your Godot project folder. Ideally, you should create a new folder called meshes in your project to place all your 3D models in2.
When you import these files into Godot, you’ll notice that Godot will immediately start “importing” them. This process converts the 3D models from their original formats (like GLB/GLTF, OBJ, FBX) into a format that Godot can use directly. The GLB3 file format is particularly useful because it combines the mesh, textures, lights, and animations into a single file4, making it easier to manage.
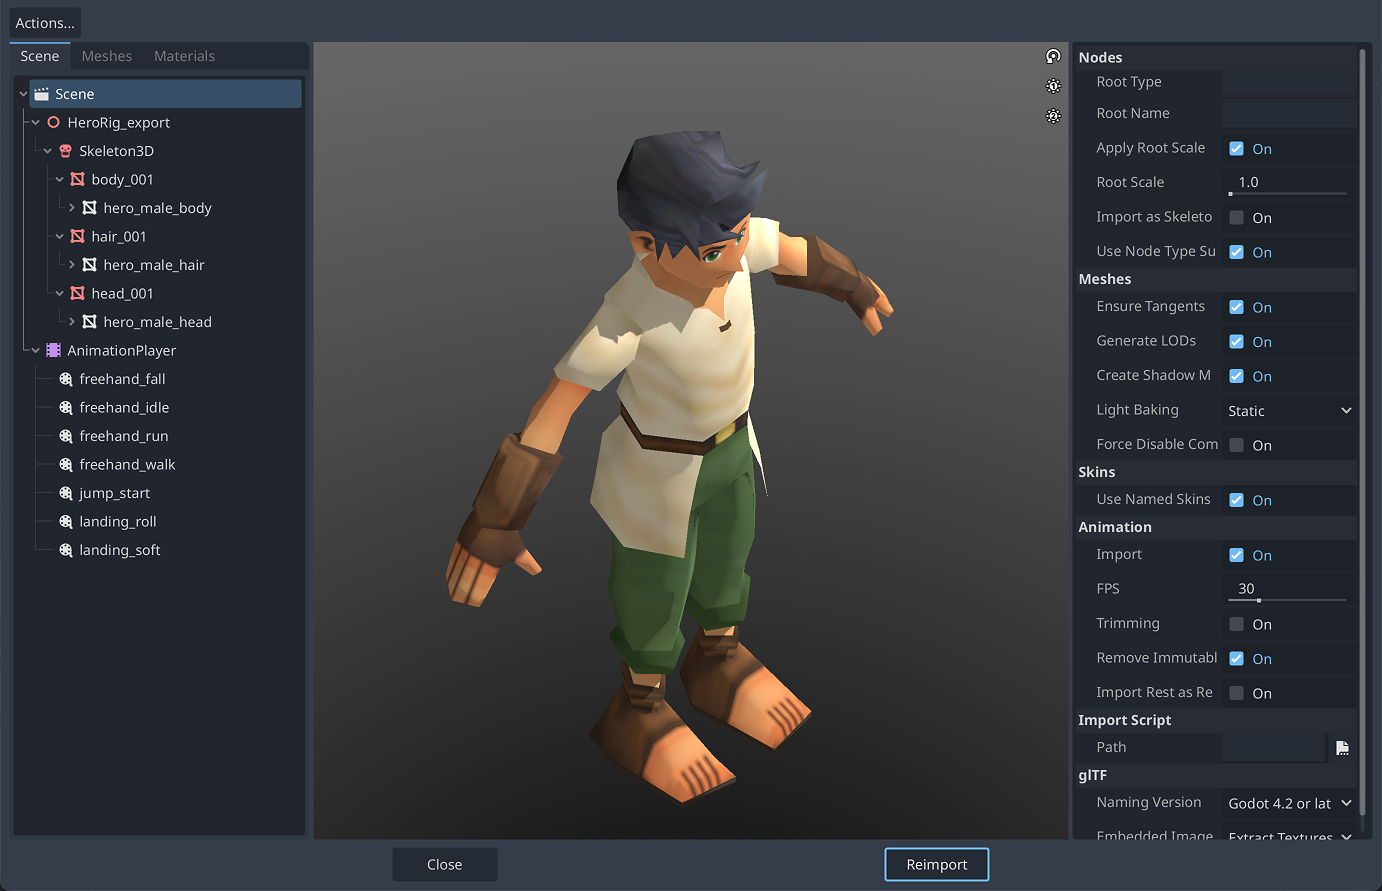
The import window lets you preview the 3D model and change import settings, but we don’t need to change anything for this episode.
If we click on our .glb file in Godot’s project browser we’ll see the 3D preview and import settings for this model. You may notice on the left that we see something that looks an awful lot like a scene tree with nodes. That’s because GLB files automatically become scenes when imported into Godot, since that’s the structure Godot relies on internally to perform 3D rendering and transformations.
We’ll spend more time with this import window as we continue through future episodes, but let’s move on to actually using these assets in our game.
Importing 3D assets with collision
When looking at the dev level asset, you may notice that we have StaticBody3D nodes for each of the walls and floors (which are MeshInstance3D nodes).
When creating assets in another program like Blender, we can use special suffixes, like
-color-colonly, when naming objects to have Godot automatically create collision shapes that match the visual geometry.
Replacing our basic whitebox levelJump to 3:05
Over the next few episodes, we’re going to be expanding our player character’s capabilities, but this is going to be hard to test if our game world is a single box. Ideally we want ramps, walls, ledges, and other features so we can test our character’s movement and camera controls.
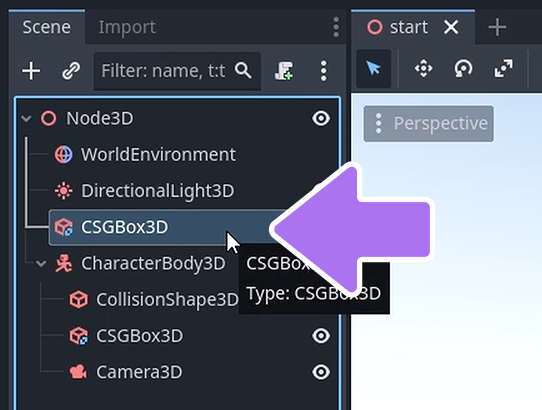
This what our first asset is for! The test_level.glb file is a simple test level that has ramps, walls, and other features that were designed explicitly for this purpose. To use this asset in our scene, we just need to delete the existing CSGBox3D node in our scene and then drag the test_level.glb file from the project browser onto the root node of our scene.
This will automatically create a new test_level node with the mesh and collision shapes from the GLB file at the world origin5.
Creating our new player sceneJump to 3:48
Before we change our player character from a salmon cube to something more interesting, we should rename our node from CharacterBody3D to Player and then create a new scene for our player. We can do this by right-clicking on the Player node in the scene tree and selecting “Rename” or by pressing the F2 key on your keyboard when the node is selected.
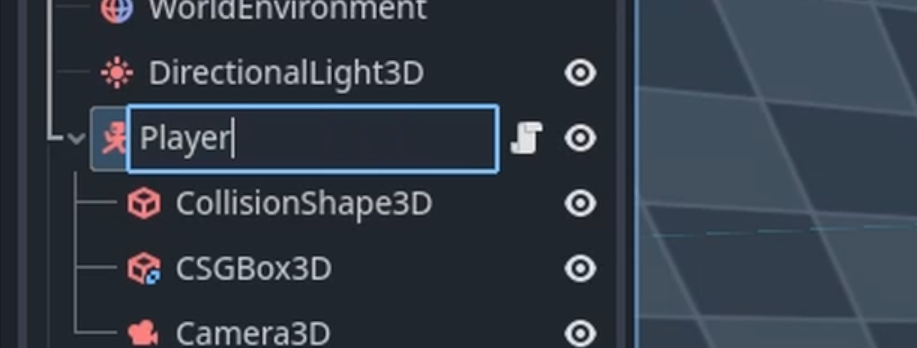
We want to rename our CharacterBody3D node to Player so that we can easily identify it in our scene tree and scripts.
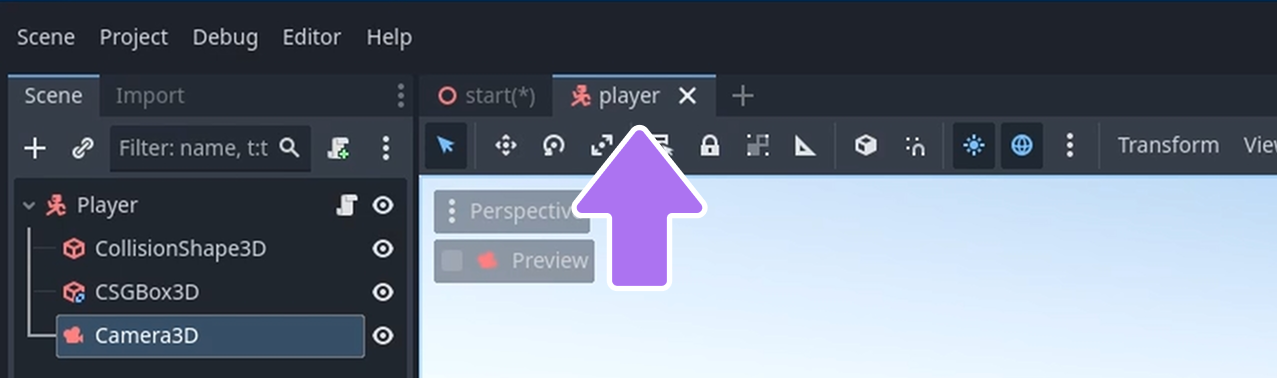
We can do this easily by right-clicking on the Player node in the scene tree and selecting “Save Branch to Scene”. This will create a new scene with the player node as the root, allowing us to save it as player.tscn in our Scenes/ folder.
Once we’re done with this we’ll notice we still have Player in our scene, but we can’t see its children and there’s now a icon next to the node name. This icon indicates that this node is an “instance”6 of a scene, and the icon provides a quick way to open our original scene file.
We can quickly switch between our open scenes using the tabs at the top of the editor.
By moving our player to its own scene, we can keep our player’s nodes organized in a single place and easily “instantiate” them in other scenes, like our test level. This is going to be important as we continue to build our game, especially when we start adding enemies, props, and other game objects we may want to reuse in different parts of our game.
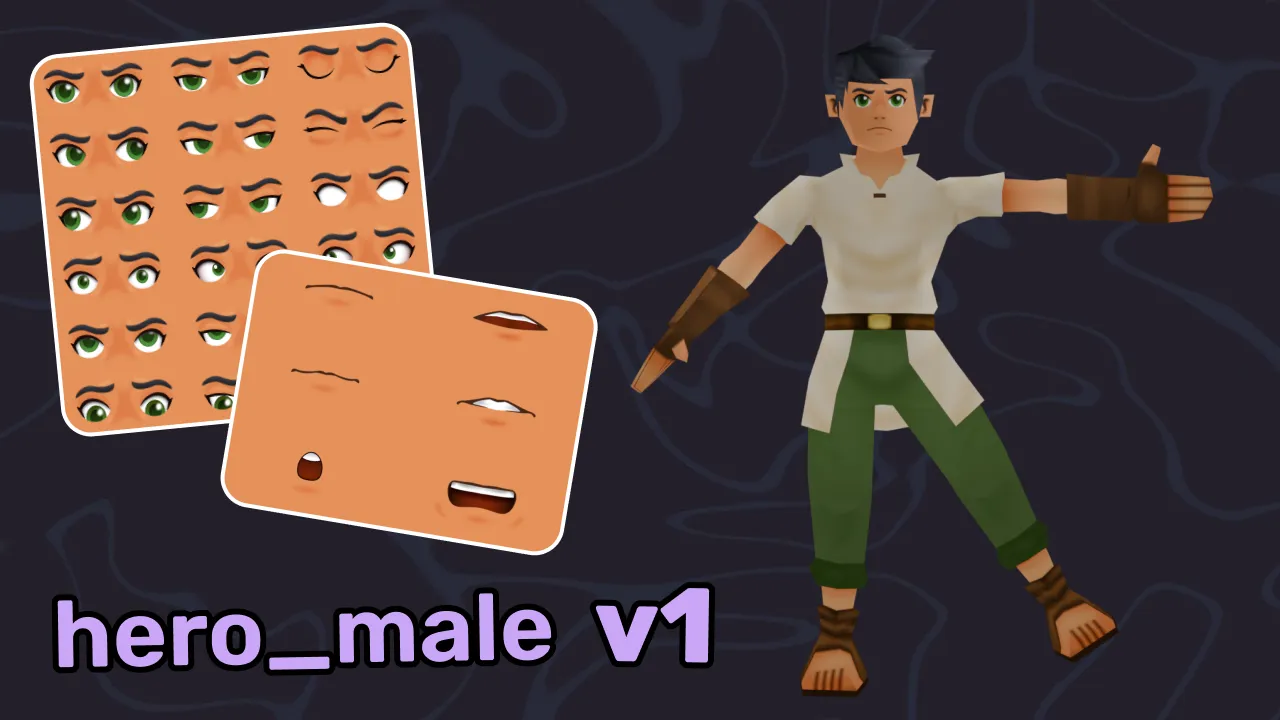
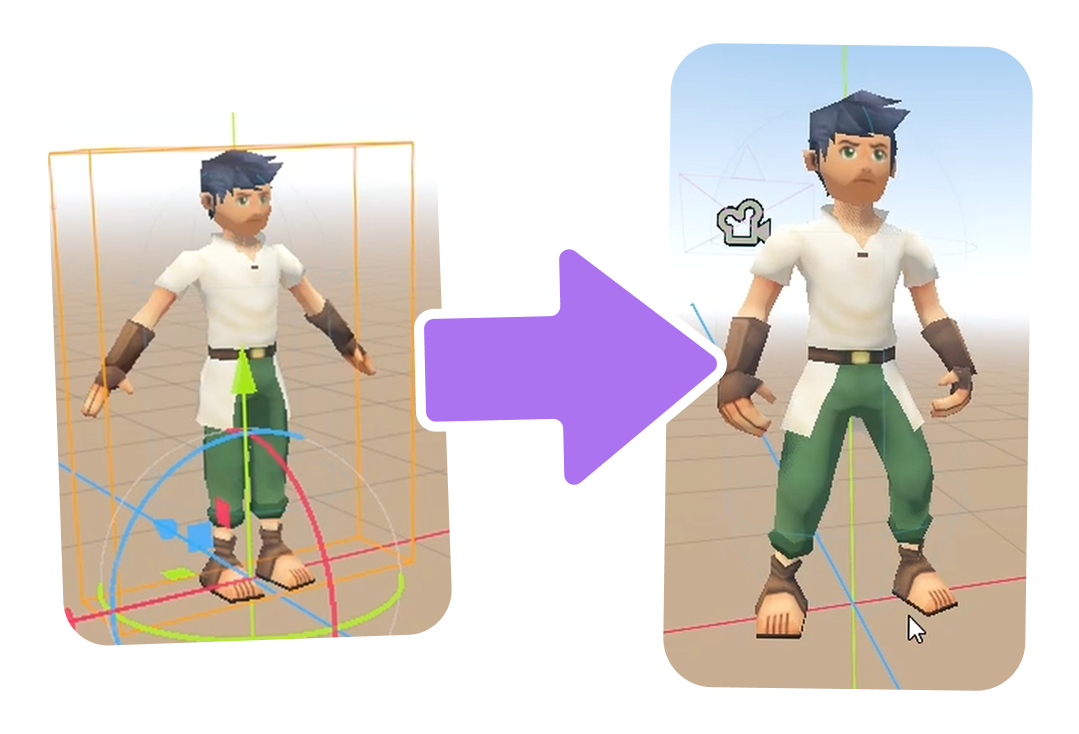
Adding our character modelJump to 4:48
It’s finally time to say goodbye to our salmon cube and hello to our hero character! To do this, we’ll take the hero_male.glb file from our assets and drag it into our player scene. This will create a new hero_male node with the character mesh as its child.
Let’s rename this node to Mesh to make it clear that this is our character’s visual representation. The next step is to get our character’s model facing the correct direction. Since Godot uses negative Z for forward, we’ll need to rotate our character mesh 180 degrees on the Y axis7 to spin them in place.
Switching up our player’s starting poseJump to 6:00
Our player character is currently asserting their dominance with a T-pose, so let’s change that to something a bit more relaxed by setting our default animation. This is done through an AnimationPlayer node, which is automatically created when we import a model with animations.
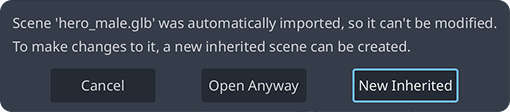
But… how do we access this node? Our Mesh node is an instance of a scene and if we try to open it directly, it tells us we need to create an inherited scene to edit it.
What does that even mean?
What’s happening is that scene Godot created to represent the mesh is actually a readonly scene. This is likely done to prevent accidental changes to the original mesh file, which could cause issues if we try to re-import it later. Luckily, we can make changes to a node (and its children) as “overrides”, allowing the underlying scene to remain unchanged while we can still modify the instance in our player scene.
An inherited scene is a way of doing this, but we don’t want to have to create another scene just to customize the mesh for our player scene, right? Instead, we can make the children of our Mesh node editable by right-clicking on the node in the scene tree and selecting “Make Editable”. This will allow us to access the internal nodes of the mesh, including the AnimationPlayer node.
An introduction to Godot’s animation systemJump to 6:35
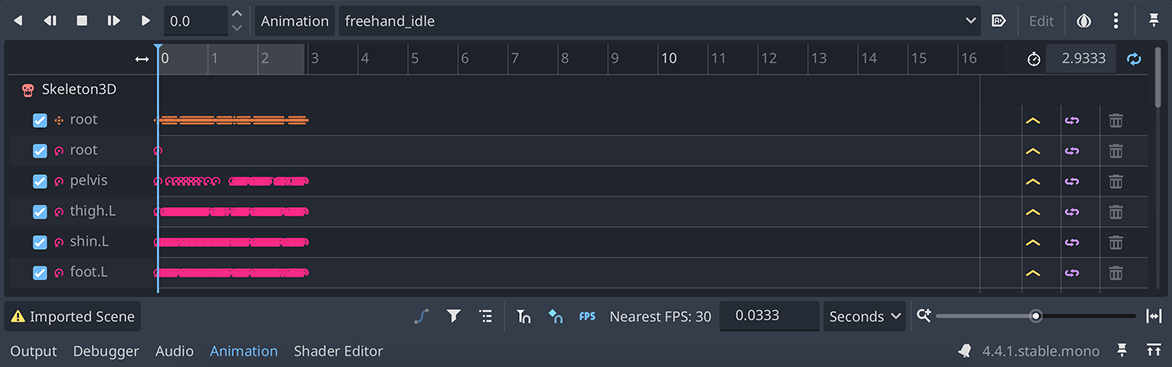
You might have noticed that clicking the AnimationPlayer opened the Animation tab in the bottom panel. This is where we can see all the animations that are available for this node, which should represent all the animations that were imported as a part of our character model.
Starting at the top right we can find our playback controls (play forward, play backward, stop, etc…) and to the right of that we have a button that opens an animation menu, followed by a dropdown that shows the currently selected animation.
There’s more stuff to the right that we’ll explore as we go, but we should briefly talk about the area directly underneath this set of controls on the top. This is our timeline, also called the “animation track list”, and it shows the tracks8 and keyframes9 that make up the selected animation.
We want to put our character into a more relaxed or “idle” pose. To do this, let’s click the top dropdown and select the freehand_idle animation10. This will change the animation that is currently selected in the animation player, and we’ll notice that the timeline and character mesh update to reflect a frame of this animation.
Wait… it’s not playing!Jump to 7:22
If you try running your game now, you’ll notice that the character is still in a T-pose and not playing the freehand_idle animation. This is because we haven’t set up the animation player to automatically play this animation when the game starts11.
To fix this, we can click the button to the right of the animation dropdown. This is the “Autoplay on Load” button and tells our AnimationPlayer node to automatically play the selected animation when the node is loaded into the scene. This will cause button to turn blue and the freehand_idle animation will now play as soon as we run our game, giving our character a more relaxed pose12 and a bit of life.
Setting up our camera “rig”Jump to 8:00
We have our character model in place and looking good… kinda. We can only really see the back of them. Let’s change that by starting on our camera system. Now originally we were planning on showing you how to create a camera like the one in The Legend of Zelda: Ocarina of Time. However, this is a far more complicated system to implement and doesn’t follow the more modern trends of allowing the player to control the camera directly13.
Instead we’ll create a camera system that works more like Breath of the Wild or Dark Souls, where the player is in control using either their mouse or right analog stick on a controller. This will allow us to create a more modern camera system that feels more natural and responsive to player input14.
What if I want the classic camera system?
Well, we’ve already built a camera system that works like that for our demo project. If you want us to cover it or potentially just some heavily documented source code, let us know! The best way to do this is in the comments of our video or in our Discord server.
There’s a lot that can go into a camera system for a game and it’s a critical part of the player experience and there’s a number of ways to implement it. For our game, we’re going to rely on a few nodes and some simple math and scripting to reduce the complexity of our camera system while still providing a good experience for the player.
To start, we’ll want to “wrap” our current Camera3D node with another node. We’re going to do this for two reasons.
The first is that this will let us maintain an “offset” from our camera’s focal point in a more visual way without having to do a lot of transformation math in our code. The second is that this will allow us to add a SpringArm3D node to prevent our camera from clipping15 through walls and other objects in our game world.
The fastest way to do this is to right-click on our Camera3D node in the scene tree and select Reparent to New Node.... This will create a new node that is the parent of our camera, allowing us to move it around without affecting the camera’s position directly. We’ll select the SpringArm3D node.
Explaining the SpringArm3D nodeJump to 8:37
A “spring arm” is a node that attempts to keep a camera at a certain distance “back” from itself. The quotes around “back” are because the spring arm can be positioned in any direction, but it will always try to maintain a certain distance relative to its parent node’s position and rotation.
This means we can use the spring arm like a pivot point for our camera, with the camera always looking towards this pivot point. If we want our camera to orbit around the player, all we need to do is rotate the spring arm — that’s pretty easy!
But that property alone isn’t unique to the spring arm, you can do that with any 3D nodes in Godot. No, the thing that makes the spring arm special is that if something gets in between the spring arm’s position and where it wants to place the camera, then it will automatically adjust the camera’s position to avoid clipping or being placed on the other side of an object that would block the camera’s view16.
Cases to ignore obstruction
There are some cases where you might not want the spring arm to adjust the camera’s position. For example, a window or a really thin object don’t block the player’s view in the same way that a wall does. In these cases, we can use the
collision_maskproperty of the spring arm to ignore certain objects or layers, allowing the camera to pass through them without adjusting its position.We’ll cover collision masks in greater detail as we continue through the series, but it’s worth mentioning!
Positioning the spring armJump to 9:15
The operation we used to re-parent the camera to the spring arm automatically positioned it at the origin of the scene, which happens to be the same position as our player character’s feet. Not ideal… So we’ll bring our SpringArm3D up to somewhere around the character’s chest or head on the Y axis.
Interestingly, even though our Camera3D node is positioned quite a bit higher than the SpringArm3D , when we play the game, the camera will still be positioned at the same height as the spring arm, just back a bit. This is because the SpringArm3D node moves the camera every physics frame to maintain the spring_length value17 we set in the inspector.
Let’s reset our Camera3D node’s transform using the button on both the transform’s position and rotation properties in the inspector. You should now see that the Camera3D node is positioned at the exact same position as the SpringArm3D . Now pull the Camera3D node back on the Z axis by the same amount as the spring_length property, giving us a visualization of where the camera will be positioned when the game is running.
We could now go back and forth between the SpringArm3D and Camera3D nodes to adjust the camera’s position, but this would be very tedious. Instead, we can use some code do this for us. Go ahead and position the SpringArm3D node as far back as you like, using the camera preview in the inspector to get an idea of what this will look like in-game.
Our second script!Jump to 11:42
For the first time in this series, we’re going to write some actual game code ourselves from scratch. With the SpringArm3D node selected, right-click and select Attach Script or click the button to setup new script for the spring arm. We’ll name this script camera_rig.gd and save it in our Scripts/ folder.
1extends SpringArm3D
2
3
4# Called when the node enters the scene tree for the first time.
5func _ready() -> void:
6⇥pass # Replace with function body.
7
8
9# Called every frame. 'delta' is the elapsed time since the previous frame.
10func _process(delta: float) -> void:
11⇥pass
The first thing we want to do is grab a reference to our Camera3D node so we can grab its position. We’ll make a new property18 named camera and the type is going to be Camera3D19, just like our Camera3D node.
1extends SpringArm3D
2
3var camera: Camera3D
We have somewhere to store our camera reference, but now we need to actually get a reference to the camera node itself. We can do this by using the get_node() function inside of our _ready() function. Since this function is called when our node (and its children) have been added to the scene tree, we can be sure that our camera node is already there and we can safely get a reference to it.
6func _ready() -> void:
7⇥pass # Replace with function body.
7⇥camera = get_node("Camera3D")
The argument we pass to get_node() is the “path”20 to the node we want to get a reference to. In this case, the Camera3D node is a direct child of our SpringArm3D node, so we can just use the name of the node itself. If the camera was nested deeper in the scene tree, we could use a path like "/root/Player/Camera3D" to get a reference to it.
With a reference to our camera node, we can now access its properties and methods. So the next thing we’ll do is set the spring_length property of our SpringArm3D node that our script is attached to. We can use the position property of camera to find the z component and set the spring_length to be that value.
6func _ready() -> void:
7⇥camera = get_node("Camera3D")
8⇥spring_length = camera.position.z
Sweet! Now when we run our game, the camera will be positioned at the same distance from the player as the spring_length property. This means that if we change the position of the camera in the inspector, the spring arm will automatically adjust to match it.
Simplifying our code with @onreadyJump to 14:29
Our code’s got a little long for being such a simple script. Thankfully there’s a couple things we can do it make it shorter and easier to read. The first is to use a new annotation called @onready. We use this in a similar way to the @export annotation we showed in episode 2.
1extends SpringArm3D
2
3@onready var camera: Camera3D = get_node("Camera3D")
4
5# Called when the node enters the scene tree for the first time.
6func _ready() -> void:
7⇥camera = get_node("Camera3D")
7⇥spring_length = camera.position.zHow about some syntactic sugar?Jump to 15:05
Another handy shortcut that GDScript provides is the $ operator. This is syntax that is unique to Godot and GDScript and is a shorthand for the get_node() function. This means that we can use $Camera3D instead of get_node("Camera3D") to get a reference to our camera node.
1extends SpringArm3D
2
3@onready var camera: Camera3D = get_node("Camera3D")
3@onready var camera: Camera3D = $Camera3D
When syntax is introduced to make code shorter or easier, we call it “syntactic sugar”. It’s not a necessary thing for the language to support, but it often makes things more pleasant. Just like you don’t need to add desert to a meal, but it sure makes it more enjoyable!
That’s the first part of our camera system done. If you did everything correctly, you should have a script that looks like this:
1extends SpringArm3D
2
3@onready var camera: Camera3D = $Camera3D
4
5# Called when the node enters the scene tree for the first time.
6func _ready() -> void:
7⇥spring_length = camera.position.zActually movingthe cameraJump to 16:09
We want our camera to be able to move around the player character using either the mouse or the right analog stick on a controller. Starting with the controller, we need to head into our project settings and add some new input actions21 for the camera movement. We’ll add the following actions:
| Action Name | Input |
|---|---|
view_left | Joypad Axis 2 - (Right Stick Left, Joystick 1 Left) |
view_right | Joypad Axis 2 + (Right Stick Right, Joystick 1 Right) |
view_up | Joypad Axis 3 - (Right Stick Up, Joystick 1 Up) |
view_down | Joypad Axis 3 + (Right Stick Down, Joystick 1 Down) |
With that taken care of, we’re going to jump into the _process function22 that Godot helpfully created for us. This function is called every frame and will be a good spot for us to ask Godot for the current input from the controller. We’ll use the Input.get_vector() function to get a normalized Vector2 representing the input from the right analog stick.
Singletons and the
InputclassThis might be a good time to talk about singletons a bit more and what they are. Singletons are a special type of object in Godot that are created automatically when the game starts. The
Inputclass is a singleton that provides access to the input system, allowing us to check for input actions, get the current mouse position, and more.Unlike regular variables, singletons are named using
PascalCase(like classes) instead ofsnake_case. This is a convention in Godot to indicate that these are special objects that are always available and should not be confused with regular variables. It can definitely be confusing though!We’ll be able to make our own singletons later on in the series through Godot’s autoload feature. This is extremely useful when you’re building larger games and need to share data or functionality across multiple scenes or scripts.
Using the names of the input actions we just created as arguments23, we can get a Vector2 with the x component representing left/right movement and the y component representing up/down movement. Each component will be a value between -1 and 1, where 0 means no input in that direction. This means that if the player is pushing the right analog stick to the right, the x component will be 1, and if they push it to the left, the x component will be -1.
11func _process(delta: float) -> void:
12⇥pass
12⇥var look_input := Input.get_vector("view_left", "view_right", "view_up", "view_down")
By experimenting with the transform in the 3D editor, we can figure out which axes we want to change using our controller input in order to rotate the camera around our player character. For us, this will be the x for the “pitch” (up/down rotation) and the y for the “yaw” (left/right rotation).
This means that we can use the x component of our input to rotate the SpringArm3D around the y axis, and the y component of our input to rotate the SpringArm3D around the x axis24. We can do this by adding25 the input using the += operator to the rotation_degrees property of the spring arm. This property is a Vector3 that represents the rotation of the node in degrees, rather than radians26.
11func _process(delta: float) -> void:
12⇥var look_input := Input.get_vector("view_left", "view_right", "view_up", "view_down")
13⇥rotation_degrees.x += look_input.y
14⇥rotation_degrees.y += look_input.xFine-tuning our camera controlsJump to 22:02
To make our camera controls feel more natural, we want to adjust the sensitivity of the camera rotation. We can do this by introducing a new property called turn_rate that will control how fast the camera rotates based on the input.
1extends SpringArm3D
2
3@onready var camera: Camera3D = $Camera3D
4@export var turn_rate := 1.0
At this point in the video, Jack noticed that the camera was rotating the opposite way he expected it to. We could negate these values to fix this issue later when adding the input to the spring arm rotation, but instead we chose to just swap the arguments being passed to Input.get_vector(). So we’ll make that change in our code now, swapping the order within each “pair” of arguments.
11func _process(delta: float) -> void:
12⇥var look_input := Input.get_vector("view_left", "view_right", "view_up", "view_down")
12⇥var look_input := Input.get_vector("view_right", "view_left", "view_down", "view_up")
13⇥rotation_degrees.x += look_input.y
14⇥rotation_degrees.y += look_input.x
It's an iterative process
In hindsight, it might have been better to do that because we’ll eventually need to negate the mouse input as well to correct the rotations. This is a great example of how game and software development is iterative. You may discover a better solution later on, or realize that you could have done something differently, but only after you’ve written the code and understand everything needed to solve the problem.
We’ll multiply the input by this value and then by delta to make sure the rotation is frame-rate independent27. Try messing with different values to see how it affects the camera rotation speed. A higher value will make the camera rotate faster, while a lower value will make it rotate slower.
12func _process(delta: float) -> void:
13⇥var look_input := Input.get_vector("view_right", "view_left", "view_down", "view_up")
14⇥look_input = turn_rate * look_input * delta
15⇥rotation_degrees.x += look_input.y
16⇥rotation_degrees.y += look_input.x
An alternative approach
There are a lot of ways you can solve the same problem but with different code. Here’s an example of another way we could’ve written this.
Since the order of multiplication doesn’t really matter in the expression on line
14and because the multiplication expression contains thelook_inputvalue, we could’ve used a multiplication assignment (*=) to make the code shorter.12func _process(delta: float) -> void: 13⇥var look_input := Input.get_vector("view_right", "view_left", "view_down", "view_up") 14⇥look_input *= turn_rate * delta 15⇥rotation_degrees.x += look_input.y 16⇥rotation_degrees.y += look_input.x
The value of turn_rate is set to 1 by default, which means that the camera will rotate at a rate of 1 degree per second for every 1 unit of input. This is going to be way too slow for the type of camera we want, so let’s set it to something higher. We felt that 200 was a good value for us, but you should feel free to experiment with different values to find what feels best for your game.
1extends SpringArm3D
2
3@onready var camera: Camera3D = $Camera3D
4@export var turn_rate := 200 #.0Preventing over-rotationJump to 26:40
Right now there’s nothing stopping us from rotating the camera all the way around and upside down using pitch. This could quickly become a problem, especially if our player is susceptible to motion sickness.
To prevent this, we need to “clamp” the pitch of our camera to stay within a certain range. This is done using a clamp() function, which takes three arguments: the value to clamp, the minimum value, and the maximum value.
Since GDScript is a dynamically typed language by default28, the standard clamp() function will work with any numeric type. That doesn’t make the type-checker very happy though, so we need to use a variation of the clamp() function that is specific to float values. This is why the clampf() function exists, which is built-in into GDScript just like clamp()29.
We’ll use this function to clamp the current value of the x axis (pitch) of our rotation and replace it with the clamped value. What values you use for the minimum and maximum will depend on your game, but you’ll likely want to keep the pitch within -80 to 80 degrees to prevent the camera from flipping upside down30.
We chose to use -70 and 50 degrees, which gives us a bit more freedom to look up and down without going too far.
14func _process(delta: float) -> void:
15⇥var look_input := Input.get_vector("view_right", "view_left", "view_down", "view_up")
16⇥look_input *= turn_rate * delta
17⇥rotation_degrees.x += look_input.y
18⇥rotation_degrees.y += look_input.x
19⇥rotation_degrees.x = clampf(rotation_degrees.x, -70, 50)Adding a “buffer” around our cameraJump to 29:27
If we were to get close to a wall or look up at the sky, you may notice there’s some clipping happening with the camera. We’re not going all the way through the wall or floor, but we are getting close enough that part of our camera winds up inside the wall or floor.
This is happening because the SpringArm3D node is currently shooting a very thin line from its position to the camera’s desired position in order to detect if there are any objects in the way. It’d be great if we could give ourselves a bit of a buffer around the camera so that it doesn’t clip through walls or other objects in the game world.
Thankfully, there is! We can change our SpringArm3D node to use a collision shape to perform a “shape cast” instead of a ray cast[^shape-cast]. This means it will use a larger object, like a sphere, to check for collisions instead of just a line.
Just imagine a zorb ball around the camera, where the camera is inside the ball. This means that if the camera gets close to a wall, the spring arm will adjust the camera’s position to stay outside of the sphere, preventing it from clipping through walls or other objects in the game world.
Adding mouse supportJump to 31:11
At this point, we have a working camera system that allows us to control the camera using the right analog stick on a controller. However, we also want to allow players to control the camera using the mouse.
To do this, we need to add some new code to our script that will handle mouse input. Up to this point we’ve been able to “poll” for input using the Input class. However, mouse input is a bit different because it is event-driven. This means that we need to override the _input() function in our script to handle mouse events.
Event-driven vs Polling Input
When handling input, we have two main patterns. The first is “polling”, where we essentially ask the input system for the current state of the input every frame. This is what we’ve been doing with the
Input.get_vector()function.The second is “event-driven”, where we “listen” for specific input events and handle them only when they occur. This is what we’ll be doing with mouse input. There’s trade-offs for each approach, and we’ll need to use a combination of them here to get the desired behavior for our camera system.
Like _ready or _process, the _input() function is called automatically by Godot when an input event occurs. The event parameter passed to this function is an instance of the InputEvent class, which is the base class for all input events in Godot, and it contains a bunch of information about the input event that occurred.
You can add this new function anywhere in your script, provided it’s not inside another function. We’ll add it right after the _process() function.
18func _input(event: InputEvent) -> void: [!code ++]Now we need to figure out what type of input event we have and only do something if it’s an event we care about. What we’re interested in is the InputEventMouseMotion event, which is fired when the mouse is moved. We can check if the event is an instance of this class using the is keyword.
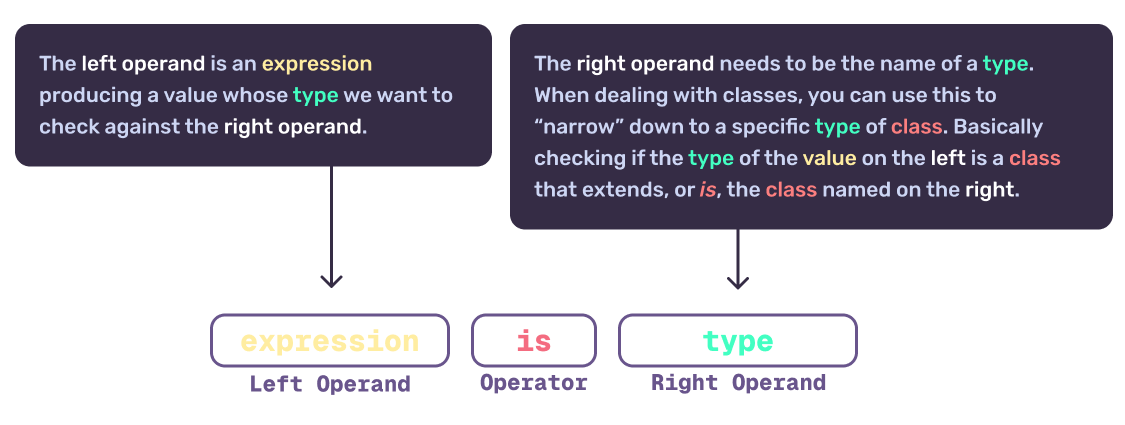
18func _input(event: InputEvent) -> void:
19⇥if event is InputEventMouseMotion:
Is this the same as
==?If the
iskeyword is a bit confusing to you, that’s understandable. When we use==, we’re checking if the value on the left is the same value as what’s on the right. This is a value comparison, meaning that it checks if the two values are equal.The
iskeyword is a type comparison; it checks if the value on the left is an instance of the type on the right. So in our case, we knoweventis anInputEvent, but we want to know if it’s an instance of theInputEventMouseMotionclass specifically.
Now that we know we have a mouse motion event, we can access the relative property of the event to get the amount of movement in pixels since the last frame. This will give us a Vector2 with the x and y components representing the movement in pixels.
18func _input(event: InputEvent) -> void:
19⇥if event is InputEventMouseMotion:
20⇥⇥var mouse_input: Vector2 = event.relative
Why can't we use
:=here?The type inference operator requires that the
typeof the value on the right-hand side is known by the computer. Even though we logically checked thateventis anInputEventMouseMotion, GDScript’sisoperator doesn’t actually change the type ofeventtoInputEventMouseMotion. It just checks if it is an instance of that class.While many languages will automatically narrow the type of a variable based on a check like this, GDScript does not31. This means that we need to explicitly declare the type of
mouse_inputasVector2using thevarkeyword, rather than using the:=operator.
But we have a problem… we’re going to need this mouse_input value every frame, not just when the mouse is moved. And the code that’s running every frame is in the _process() function, not the _input() function. How do we get this value to be available in the _process() function?
The answer is to store it in a class property, outside of any function. We’ll create a new property called mouse_input32 and set it to Vector2()33 by default. This will give us a place to store the mouse input value that we can access in the _process() function.
1extends SpringArm3D
2
3@onready var camera: Camera3D = $Camera3D
4@export var turn_rate := 200.0
5var mouse_input: Vector2 = Vector2()
Now on line 23, we can set the mouse_input property to the value of event.relative, instead of creating a new variable that only exists within the _input() function. This means that we can access the mouse_input property in the _process() function and use it to rotate the camera.
19func _input(event: InputEvent) -> void:
20⇥if event is InputEventMouseMotion:
21⇥⇥var mouse_input: Vector2 = event.relative
21⇥⇥mouse_input = event.relativeIntegrating our mouse inputJump to 35:27
We’re now capturing the how much the mouse moved the last time it was moved, but we need to use this value to actually rotate the camera. That means it’s time to head back to our _process() function.
Again there are multiple ways we could do this, we’ll just keep it simple and add the mouse_input to our look_input variable. This means our camera will rotate based on both the controller input and the mouse input34.
That’s ok though, because this means that if the controller is not being used, it’ll just be a Vector2 with the x and y components set to 0, and the camera will only rotate based on the mouse input, and vice versa.
12func _process(delta: float) -> void:
13⇥var look_input := Input.get_vector("view_right", "view_left", "view_down", "view_up")
14⇥look_input = turn_rate * look_input * delta
15⇥look_input += mouse_inputThe camera won’t stop moving!Jump to 38:01
We have a new problem though… the camera keeps moving even when we stop moving the mouse! That’s because the _input() function is only getting called when the mouse is moved, but not when it stops moving. This means our mouse_input property is still set to the last movement we set it to.
To fix this, we can just reset the mouse_input property to a zeroed out Vector2 somewhere in the _process() function after we add it to our look_input.
12func _process(delta: float) -> void:
13⇥var look_input := Input.get_vector("view_right", "view_left", "view_down", "view_up")
14⇥look_input = turn_rate * look_input * delta
15⇥look_input += mouse_input
16⇥mouse_input = Vector2()Keeping the mouse in the game windowJump to 39:24
Right now as we move our mouse around the screen, the mouse cursor is able to leave the game window. This can be a problem if we want to keep the mouse cursor hidden and only use it for camera control. To fix this, we can use the Input.mouse_mode property to set the “mouse mode” to be Input.MOUSE_MODE_CAPTURED.
This mode will “capture” the mouse cursor and keep it within the game window, allowing us to use it for camera control without it leaving the window.
8func _ready() -> void:
9⇥spring_length = camera.position.z
10⇥Input.mouse_mode = Input.MOUSE_MODE_CAPTURED
That solves one problem, but it introduces another… quitting our game when play testing is a bit of a pain now. We can no longer just click the close button on the window, because the mouse cursor is captured and can’t leave the game window.
To fix this, we’ll need to a few things in our _input() function.
- If the
eventis not anInputEventMouseMotion - _but is an
InputEventKey… - and the
event’skeycodeproperty is equal toKEY_ESCAPE… - and the
event’spressedproperty istrue35… - then set the
Input.mouse_modeback toInput.MOUSE_MODE_VISIBLE.
We do step 1 and 2 to make sure the event is keyboard key, rather than another type of input event. Step 3 then narrows it down to only the escape key36 and then step 4 checks if the key was pressed down, rather than released. Finally step 5 is the action to perform if all the requirements have been met.
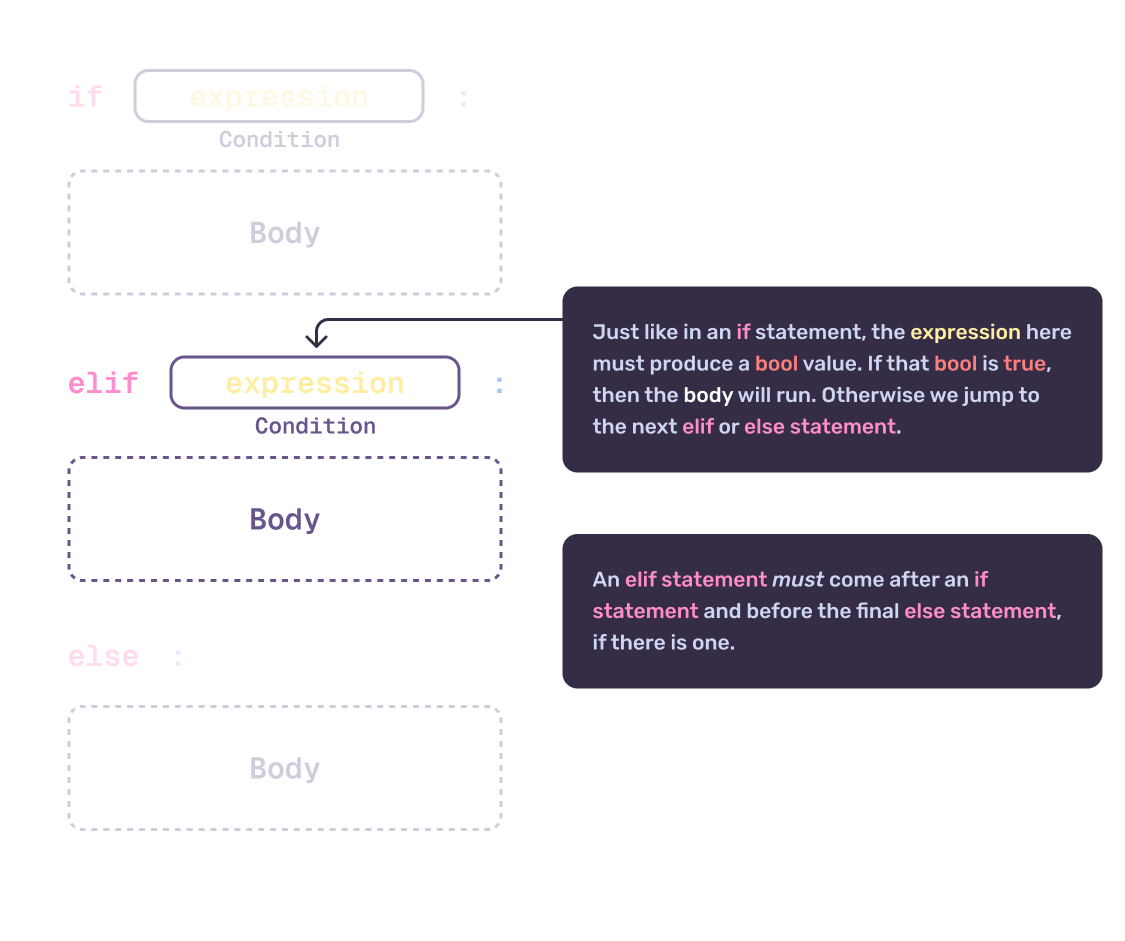
We’ll do this using a new statement type which is elif. This short for else if37 and allows us to check for multiple conditions as part of a single if statement. If the first condition is not met, it will check the next condition and if that condition is not met, it will check the next one, and so on. If none of the conditions are met, it will execute the code in the else block.
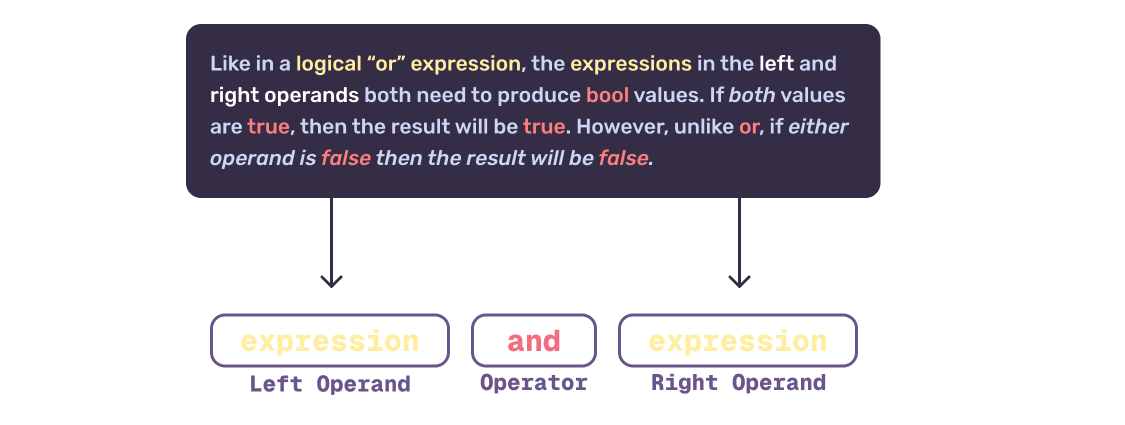
We can then change together multiple checks using and. This requires that both conditions are true in order for the entire and expression to be true. If either condition is false, the entire expression will be false.
23func _input(event: InputEvent) -> void:
24⇥if event is InputEventMouseMotion:
25⇥⇥mouse_input = event.relative
26⇥elif event is InputEventKey and event.keycode == KEY_ESCAPE and event.pressed:
27⇥⇥Input.mouse_mode = Input.MOUSE_MODE_VISIBLE
Developer shortcuts
When creating your game, there will be a lot of cases where you may want to add some “development only” code that helps you test your game. This is a great example of that. Eventually we’ll probably want to add a proper pause menu or something similar when the escape key is pressed, but for now we can just use this to make it easier to test our game without having to close the window every time.
Don’t be afraid to add code that helps you test your game quicker. Usually you’ll want to remove this code before release, but there may be times you don’t. Have you ever tried hitting ~ (tilde) in Half-Life 2? That opens up the “developer console” that lets you run commands to change the game state, spawn items, and more.
Re-capturing the mouse cursorJump to 42:51
Our mouse is free to leave the window after we press escape, now how do we get it back into the game window? Well we can add another elif statement to our _input() function that checks for mouse button input.
Here’s the rundown of what we need to do now:
- If the
eventis not andInputEventMouseMotionor anInputEventKey… - but is an
InputEventMouseButton… - and the
event’sbutton_indexproperty is equal toMOUSE_BUTTON_LEFT… - and the
Input.mouse_modeis currentlyInput.MOUSE_MODE_VISIBLE… - then set the
Input.mouse_modeback toInput.MOUSE_MODE_CAPTURED.
Step 1 and 2 are pretty much the same as before, but now we’re checking for a mouse button event instead of a key event. Step 3 checks if the left mouse button was pressed38. Finally, step 4 checks if the mouse mode is currently set to Input.MOUSE_MODE_VISIBLE, which means the mouse cursor is currently visible and not captured39.
23func _input(event: InputEvent) -> void:
24⇥if event is InputEventMouseMotion:
25⇥⇥mouse_input = event.relative
26⇥elif event is InputEventKey and event.keycode == KEY_ESCAPE and event.pressed:
27⇥⇥Input.mouse_mode = Input.MOUSE_MODE_VISIBLE
28⇥elif event is InputEventMouseButton and event.button_index == MOUSE_BUTTON_LEFT and Input.mouse_mode == Input.MOUSE_MODE_VISIBLE:
29⇥⇥Input.mouse_mode = Input.MOUSE_MODE_CAPTUREDCorrecting mouse input direction and sensitivityJump to 44:56
We’re almost to the finish line! We just have two more things that need to be fixed before we can call this camera system complete. The first is that the mouse input is inverted from what we’d expect, and the second is that the mouse sensitivity is pretty touchy.
Thankfully we can knock out both of these issues out at once. We just need to adjust the mouse_input values before we add them to the look_input variable inside of _process(). We could do that there or we can do it only when the mouse_input property is changed40.
We’re fans of making the computer do as little work as possible, so we’ll do it in the _input() function when we set the mouse_input property. We’ll start by making a new property to hold our desired mouse sensitivity, which we’ll call mouse_sensitivity. This will be a float value that we can adjust to change how sensitive the mouse input is.
1extends SpringArm3D
2
3@onready var camera: Camera3D = $Camera3D
4@export var turn_rate := 200.0
5@export var mouse_sensitivity := 0.07
6var mouse_input: Vector2 = Vector2()
Now we can create a new value from event.relative and assign the result of that to mouse_input. We can throw a - in front of event.relative to negate it, then times the result by mouse_sensitivity41.
24func _input(event: InputEvent) -> void:
25⇥if event is InputEventMouseMotion:
26⇥⇥mouse_input = event.relative
26⇥⇥mouse_input = event.relative * -mouse_sensitivityPutting it all togetherJump to 46:48
If you followed along correctly (and we didn’t miss anything) then your camera_rig.gd script should look like this:
1extends SpringArm3D
2
3@onready var camera: Camera3D = $Camera3D
4@export var turn_rate := 200.0
5@export var mouse_sensitivity := 0.07
6var mouse_input: Vector2 = Vector2()
7
8# Called when the node enters the scene tree for the first time.
9func _ready() -> void:
10⇥spring_length = camera.position.z
11⇥Input.mouse_mode = Input.MOUSE_MODE_CAPTURED
12
13# Called every frame. 'delta' is the elapsed time since the previous frame.
14func _process(delta: float) -> void:
15⇥var look_input := Input.get_vector("view_right", "view_left", "view_down", "view_up")
16⇥look_input = turn_rate * look_input * delta
17⇥look_input += mouse_input
18⇥mouse_input = Vector2()
19
20⇥rotation_degrees.x += look_input.y
21⇥rotation_degrees.y += look_input.x
22⇥rotation_degrees.x = clampf(rotation_degrees.x, -70, 50)
23
24func _input(event: InputEvent) -> void:
25⇥if event is InputEventMouseMotion:
26⇥⇥mouse_input = event.relative * -mouse_sensitivity
27⇥elif event is InputEventKey and event.keycode == KEY_ESCAPE and event.pressed:
28⇥⇥Input.mouse_mode = Input.MOUSE_MODE_VISIBLE
29⇥elif event is InputEventMouseButton and event.button_index == MOUSE_BUTTON_LEFT and Input.mouse_mode == Input.MOUSE_MODE_VISIBLE:
30⇥⇥Input.mouse_mode = Input.MOUSE_MODE_CAPTUREDLooks good to me
That should cover everything we need to do to get a basic, functional camera rig set up and running for our game. We can now control the camera using both the mouse and the right analog stick on a controller, and it should feel pretty smooth and responsive.
We hope you enjoyed this episode and everything made sense. We are still working to improve our delivery pipeline to get these out on a more regular basis.
Want to compare your work to ours? You can find a copy of the project on our GitHub repository. We track each episode as its own commit, so you can see exactly what changed between each episode. Check your work!