Welcome to Episode 6! Last time we got our character playing different animations based on their movement speed using simple conditional logic.
While this is a workable solution, it has its limitations and creating more complex animation behaviors (like blends and additive animations) will quickly become unmanageable, if not impossible, using Godot’s AnimationPlayer alone.
Today we’re upgrading to Godot’s AnimationTree node, which gives us access to powerful blending capabilities and lets us create more dynamic, procedural1 animations.
Episode Project Files
DownloadBefore you continue, you'll want to download these assets as we'll be using them in this episode. These assets are bundled in a ZIP file that you'll need to extract before copying the files into your project.
Updating our character modelJump to 1:00
First things first - we need to update our character model to include a couple of additional animations that we’ll later on. Simply drag the new model file into your meshes folder and let it replace the old one.
When in doubt, restart Godot
If your character suddenly sprouts extra eyes after importing the new model or your animations just don’t work correctly, then try restarting your Godot editor. Sometimes Godot just gets confused when assets are replaced and a restart usually fixes it. You can do this quickly by going to the
Projectmenu and selectingReload Current Project.
Setting up the AnimationTreeJump to 1:42
Let’s open our player.tscn file and add an AnimationTree node as a child of Player . Much like the scene tree, our AnimationTree node contains its own “tree” structure with nodes that define how animations blend and transition.
We need to select what kind of animation node we want to use for the root of our tree. Select AnimationTree and in the inspector, find the Tree Root property. Click the dropdown and select the second option, New AnimationBlendTree2.
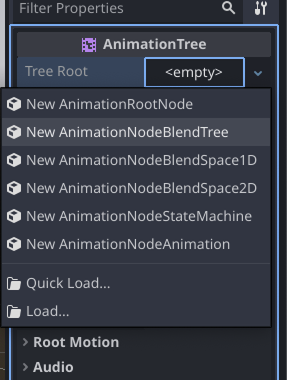
Selecting the “Blend Tree” option for the AnimationTree node’s Tree Root property.
Using a blend tree allows us to create a network of nodes that create a new pose every frame by blending together multiple animations. This approach is powerful and allows a lot of control and flexibility without getting as busy or complex as Godot’s animation state machine implementation.

We also need to assign the AnimationPlayer node to the AnimationTree so it knows where to pull the animations from. In the inspector, find the Animation Player property and click Assign to see a list of all nodes in the current scene, then just select the AnimationPlayer node.
Building our first blend treeJump to 2:21
With the AnimationTree node selected, you’ll see an AnimationTree tab appear at the bottom of the screen. This is where all the “visual scripting” for our animation blending will happen.
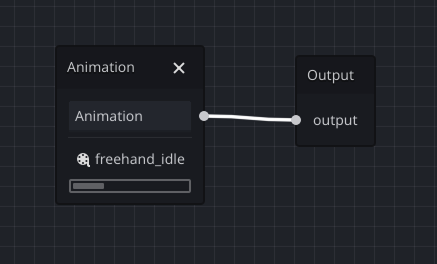
An empty blend tree with just the output node.
Right now our blend tree is empty except for an output node. Let’s start by adding a simple animation. Right-click in the graph and add an Animation node. Set it to play the “idle” animation by clicking the icon and selecting freehand_idle. Connect this node’s output to the main output node.
Great! The character should now be playing the idle animation. But we want more control than just playing one animation, so let’s build a proper transition system.
Creating animated transitions with parametersJump to 3:03
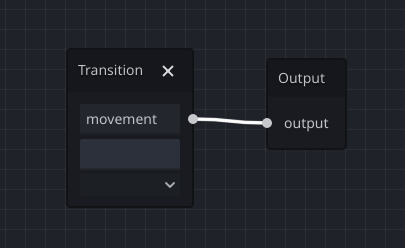
We’re going to add another node in between our animation and the output to handle transitions. Add a Transition node (right-click → Add → Transition) and unhook the idle animation from the output node. Then connect the transition node to the output.
If we click into the first box within the transition node, we can change the node’s name from Transition to something more descriptive. This name will be important when we want to control this node from our code and we’ll be using this to drive our movement state, so let’s call it movement.
This is great… but there are no pins that we can plug our animations into?

To fix this, we need to add “states” to our transition node3 through the inspector. We can find this under the Inputs section. We know we’re going to want three states: idle, walk, and run. While we’re here, let’s also set a default Xfade Time of 0.2 seconds to make transitions nice and smooth.
Connecting animations to statesJump to 4:03
Now create separate Animation nodes for each state:
- One set to
freehand_idleconnected to theidleinput - One set to
freehand_walkconnected to thewalkinput - One set to
freehand_runconnected to theruninput
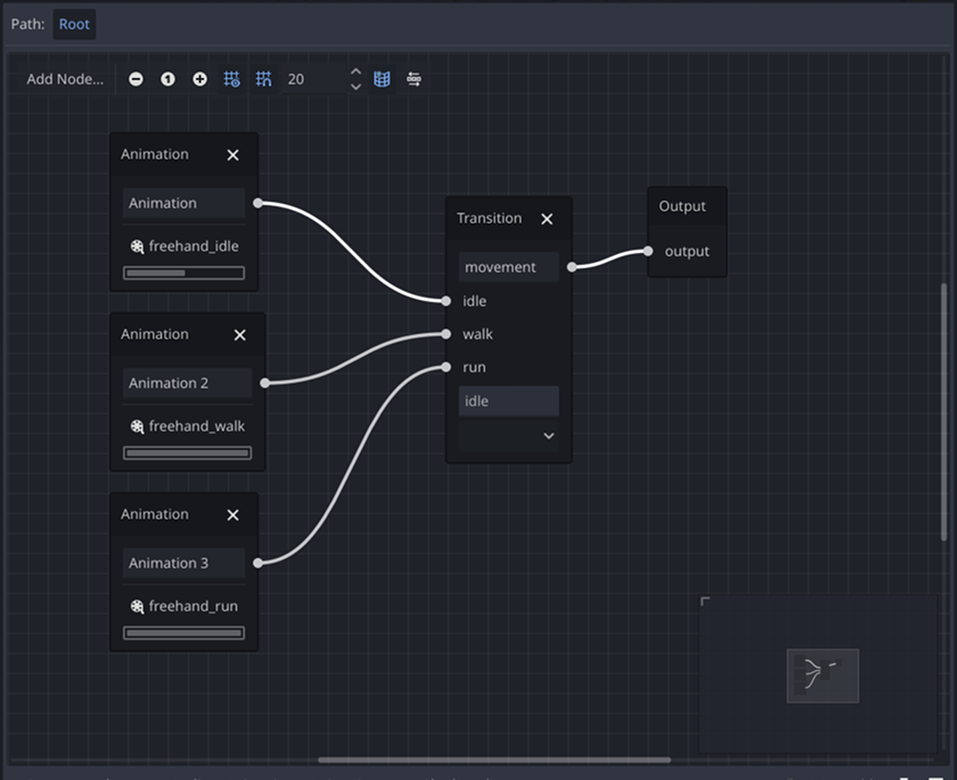
Connect the transition node’s output to the main output node. Your blend tree should now look like this:
Controlling the Animation Tree from codeJump to 5:38
Time to hook this up to our player script and replace our simple play() calls we’re doing using AnimationPlayer . First, add a reference to the AnimationTree at the top of your script.
1extends CharacterBody3D
2@onready var anim_player: AnimationPlayer = $Mesh/AnimationPlayer
3@onready var anim_tree: AnimationTree = $AnimationTree
To find the names of the parameters we want to set, we can use the Parameters section in the inspector when the AnimationTree node is selected. Here we can see two parameters that were automatically created when we added the transition node.
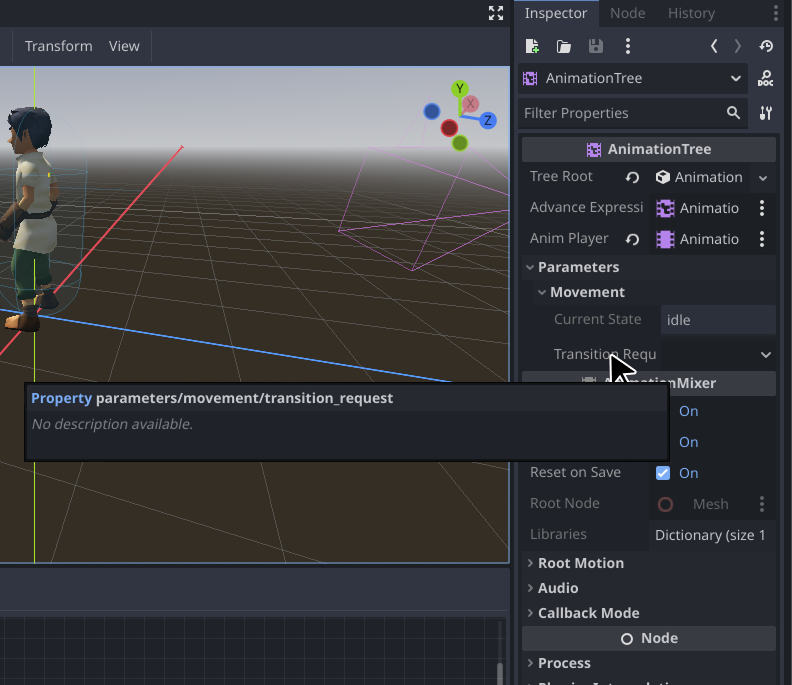
Hovering over a parameter name in the inspector shows its full path. This is a really useful tip to figure out what to pass to the set() function.
With the parameters known, let’s our .play() function calls to .set() function calls that set parameters used by our blend tree, instead of telling the animation player directly which animation to play.
34⇥var current_speed := velocity.length()
35⇥const RUN_SPEED := 3.5
36⇥const BLEND_SPEED := 0.2
37
38⇥if current_speed > RUN_SPEED:
39⇥⇥anim_player.play("freehand_run", BLEND_SPEED)
39⇥⇥anim_tree.set("parameters/movement/transition_request", "run")
40⇥elif current_speed > 0.0:
41⇥⇥anim_player.play("freehand_walk", BLEND_SPEED, lerp(0.5, 1.75, current_speed / RUN_SPEED))
41⇥⇥anim_tree.set("parameters/movement/transition_request", "walk")
42⇥else:
43⇥⇥anim_player.play("freehand_idle")
43⇥⇥anim_tree.set("parameters/movement/transition_request", "idle")
Alternative syntax to
set()Though we haven’t covered it yet, there is another syntax we can use that is often used with arrays and dictionaries. Instead of using
set(), we can use the index / subscript syntax like so:38⇥if current_speed > RUN_SPEED: 39⇥⇥anim_tree["parameters/movement/transition_request"] = "run" 40⇥elif current_speed > 0.0: 41⇥⇥anim_tree["parameters/movement/transition_request"] = "walk" 42⇥else: 43⇥⇥anim_tree["parameters/movement/transition_request"] = "idle"
Adding dynamic walk speed with TimeScaleJump to 10:03
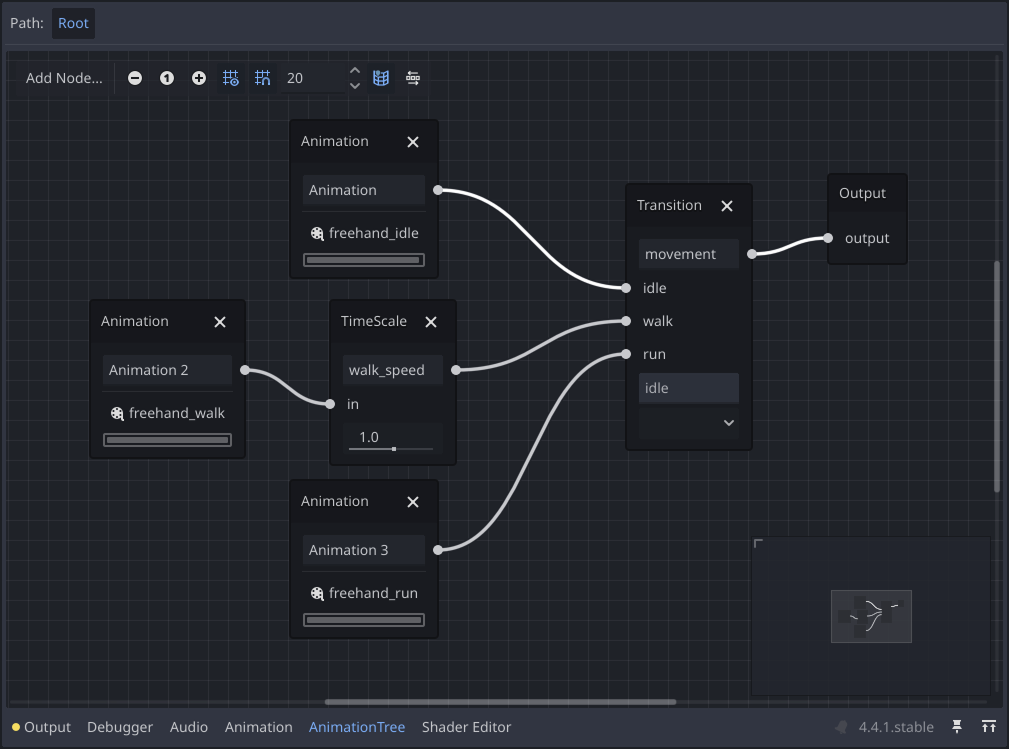
We still want our walk animation speed to vary based on movement speed. For this, we need to add a TimeScale node between our walk animation and the transition node. We’ll name this node walk_speed so we can control it from code.
Now add the walk speed calculation back to your code:
46⇥elif current_speed > 0.0:
47⇥⇥anim_tree.set("parameters/movement/transition_request", "walk")
48⇥⇥var walk_speed:= lerpf(0.5,1.75,current_speed / RUN_SPEED)
49⇥⇥anim_tree.set("parameters/walk_speed/scale", walk_speed)
With this we’re back to where we were at the end of last episode. Let’s use our new AnimationTree skills a few more finishing touches.
Adding procedural character leaningJump to 13:40
We’re going to add a subtle leaning effect when the character turns while running, similar to how a motorcycle leans into turns. This will hopefully demonstrate the power of blend trees and procedural animation.
First, let’s create our leaning setup in the blend tree:
- Switch the transition preview to “run” state
- Add an Animation node set to
pose_lean_left - Add another Animation node set to
pose_lean_right - Add an Add3 node (this blends three animations together)
Then connect the left and right lean animations to the Add3 node’s A and B inputs, and connect the run animation to the Base input. Finally, connect the Add3 node to the transition node’s run input. Make sure to name the Add3 node run_lean so we can control it from code.
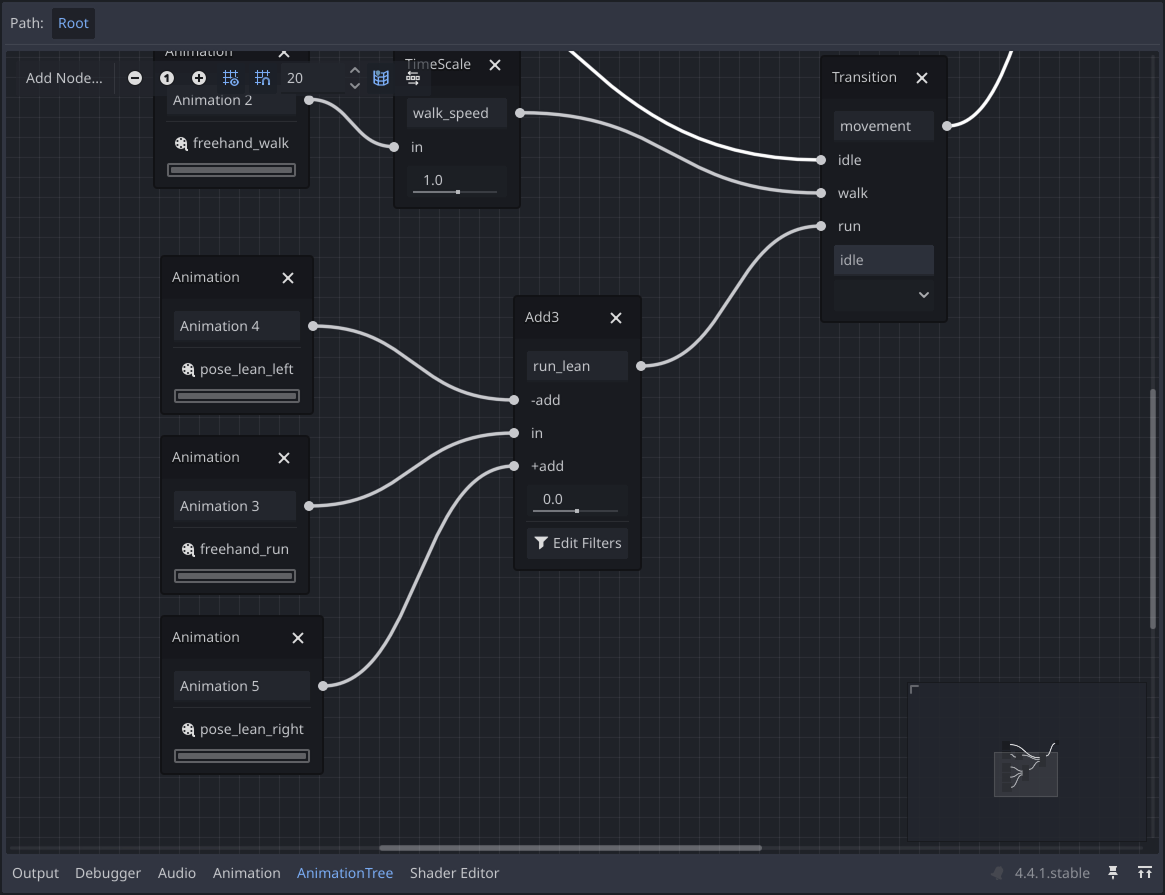
It should something look like this once everything is connected.
Calculating lean with dot productsJump to 17:16
We can employ a common, and very powerful, vector match technique here. We’ll use the “dot product” of the movement direction and the character’s current right direction vector to determine how much the character should lean based on their movement direction relative to their facing direction.
The dot product gives us a value between -1 and 1:
- -1: Moving completely left relative to facing direction
- 0: Moving straight ahead
- 1: Moving completely right relative to facing direction
We’ll plug this value directly into the add_amount property of our run_lean node to control the leaning effect where 0 is no lean, -1 is full left lean, and 1 is full right lean.
39⇥if current_speed > RUN_SPEED:
40⇥⇥anim_tree.set("parameters/movement/transition_request", "run")
41⇥⇥var lean := direction.dot(global_basis.x)
42⇥⇥anim_tree.set("parameters/run_lean/add_amount", lean)Smoothing the lean with lerpJump to 19:52
The lean effect might feel a bit too rigid or twitchy, especially on quick direction changes or when using a keyboard. We can, of course, smooth this out using lerp() to interpolate between the last lean value and the new one. We just need to store the last lean value as a property that persists between frames.
At the top of our script, add a new variable to store the last lean value:
1extends CharacterBody3D
2@onready var anim_player: AnimationPlayer = $Mesh/AnimationPlayer
3@onready var anim_tree: AnimationTree = $AnimationTree
4var last_lean := 0.0
Now update the lean calculation to use lerpf()4:
40⇥if current_speed > RUN_SPEED:
41⇥⇥anim_tree.set("parameters/movement/transition_request", "run")
42⇥⇥var lean = direction.dot(global_basis.x)
43⇥⇥last_lean = lerpf(last_lean, lean, 0.3)
44⇥⇥anim_tree.set("parameters/run_lean/add_amount", last_lean)
This creates a smooth lean that responds to direction changes without being too twitchy.
Enabling linear interpolation for smoother animationsJump to 22:12
There’s one more setting we can tweak to make our animations look even better. Godot 4.4 introduced a new physics setting that can dramatically improve how smooth your animations appear, especially when running at lower frame rates5.
Go to Project → Project Settings and search for “physics”. Under Physics/Common, find the Physics Interpolation toggle and enable it.
This setting enables linear interpolation between physics frames. This means that, even if your physics process is running at a lower tickrate (like 20fps as mentioned in some games), the visual representation will still appear smooth, often running at your monitor’s refresh rate.
To really see the difference this makes, you can temporarily lower your physics tickrate by changing Physics/Common/Physics FPS from 60 to something like 20. You’ll notice that without interpolation, everything starts to look really choppy, but with it enabled it looks buttery smooth again6.
Adding the fall stateJump to 23:48
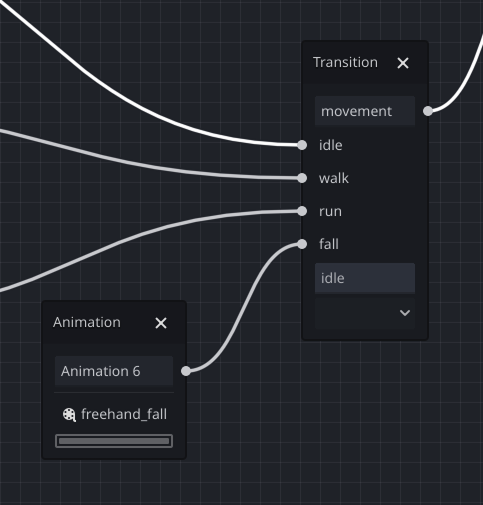
While we’re adding more animations, let’s finally get our fall animation hooked up and working. Starting with the blend tree, we’ll just add a new input to our existing transition node for the fall state and plug in the fall animation.
In our script we’ll just change the first if condition to check if the character is on the floor. If not, we’ll set the transition to fall, otherwise we’ll proceed to check the movement speed like before. Just make sure that your run condition is now an elif instead of an if, since we only want to check speed if we’re on the ground.
40⇥if not is_on_floor():
41⇥⇥anim_tree.set("parameters/movement/transition_request", "fall")
42
43⇥elif current_speed > RUN_SPEED:Customizing gravity for better game feelJump to 27:40
While we’re in the Project Settings, there’s another physics property worth experimenting with: gravity. The default gravity in Godot is set to Earth-realistic values, but many games benefit from tweaked gravity settings that prioritize fun or game feel over realism.
In the same Physics/3D section, look for Default Gravity. The default value is 9.8, which represents Earth’s gravity in meters per second squared. Try changing this value to something higher or lower and see how it affects the feel of your character’s jumps and falls.
- Higher values (12-15): Makes characters fall faster, creating snappier jumps and more responsive platforming
- Lower values (6-8): Creates more “floaty” movement, giving players more air control
- Much higher values (20+): Creates very fast, arcade-like movement
Fine-tuning with floor snapJump to 28:16
You might notice the character goes into fall state too easily when running over small bumps. We can fix this by adjusting the Floor Snap Length property on the Player node. This makes the character “stick” to the ground better on slopes and small irregularities. Let’s make it a touch longer by increasing it to 0.25.
This will help the character stay grounded better when running over uneven terrain, particularly when moving quickly down steep slopes.
What’s next
The character should feel much more alive and responsive now. Take some time to run around and enjoy watching your character lean into those turns — it’s these small details that make games feel polished and professional! We’ll continue to explore some polish techniques in the episode before we really start extending what our player character can do.
Want to compare your work to ours? You can find a copy of the project on our GitHub repository. We track each episode as its own commit, so you can see exactly what changed between each episode. Check your work!